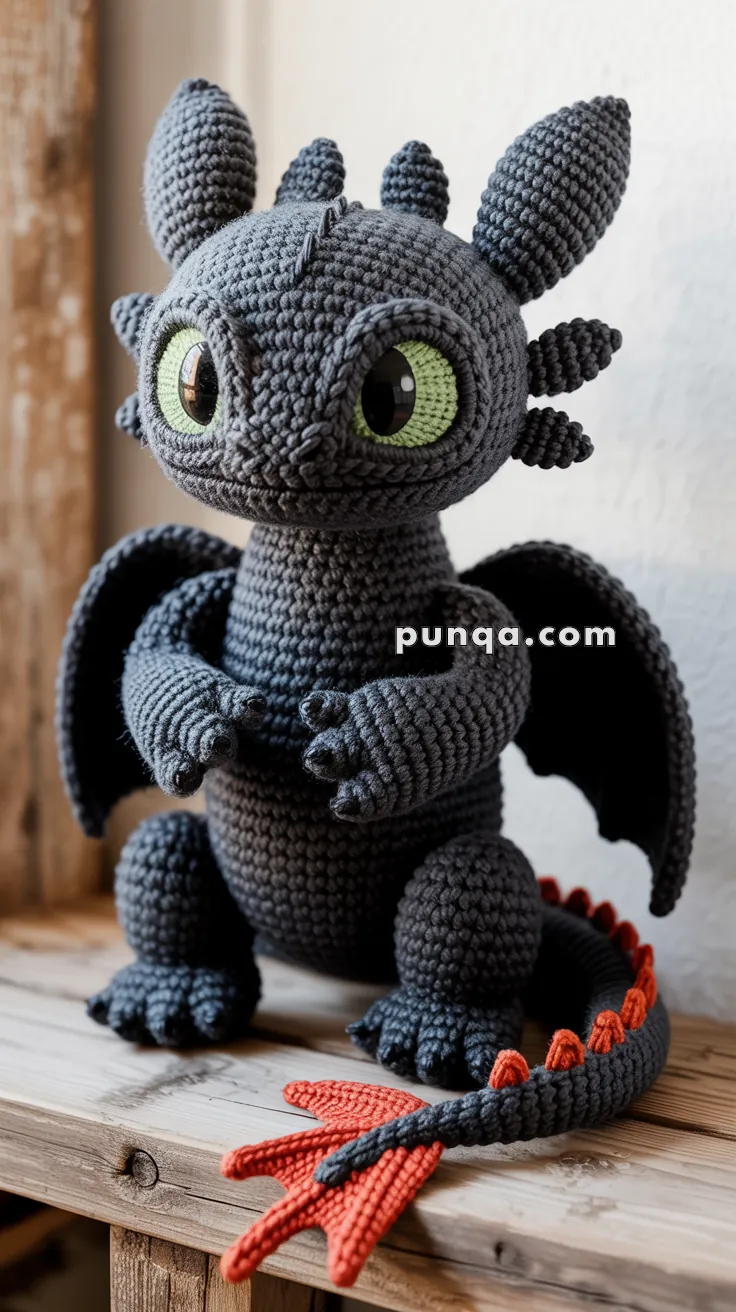
Bring a touch of dragon magic to your crochet hook with the Amigurumi Toothless (Night Fury) Dragon, a thrilling project inspired by the beloved creature from How to Train Your Dragon! 🐉💚 With his sleek black body, expressive green eyes, and signature tail fin, Toothless is the perfect blend of fierce and lovable. Whether you’re crafting for a fan of the films or simply adore mythical creatures, this little Night Fury is ready to soar into your heart and onto your shelf.
Perfect for crocheters who enjoy character-rich designs and a dash of fantasy, this pattern invites you to play with shaping, texture, and tiny details—from his bat-like wings to his mischievous grin. You can personalize your Toothless with a stitched saddle, poseable limbs, or even a glowing blue flame accessory for extra flair. Whether gifted to a fellow dragon enthusiast or kept as your own loyal companion, the Toothless Amigurumi is a legendary way to stitch up adventure—one magical loop at a time! 🌌🧶
🐉 Amigurumi Toothless (Night Fury) Crochet Pattern
Capture the magic of How to Train Your Dragon with this highly detailed Toothless-inspired amigurumi! With his oversized round head, expressive green eyes, and iconic red tail fin, this pattern recreates every detail of the adorable Night Fury in perfect proportion.
✨ Skill Level
Intermediate – includes shaping, multi-part assembly, and expressive facial construction.
📏 Finished Size
Approximately 28–30 cm (11–12 in) tall in a seated pose using DK yarn and a 2.5 mm hook.
🧶 Materials
DK yarn (100 g = 250–300 m):
- Dark charcoal gray – 250 g (head, body, limbs, horns, wings, tail)
- Red – 30 g (tail fin + tail spikes)
- Black – 20 g (tail fin)
- Leaf green – 20 g (eye backings)
Other supplies:
- 2.5 mm crochet hook
- 24 mm safety eyes
- Polyester stuffing
- Yarn needle & scissors
- Optional: wire for wings (not necessary)
🔤 Abbreviations (US Terms)
MR – magic ring
sc – single crochet
inc – increase (2 sc in one stitch)
dec – decrease (sc2tog)
sl st – slip stitch
ch – chain
st/s – stitch/es
BLO – back loop only
(..)×n – repeat n times
🪶 Head (large oval shape with rounded cheeks)
With dark charcoal gray:
R1: MR, 6 sc (6)
R2: inc×6 (12)
R3: (sc, inc)×6 (18)
R4: (2 sc, inc)×6 (24)
R5: (3 sc, inc)×6 (30)
R6: (4 sc, inc)×6 (36)
R7: (5 sc, inc)×6 (42)
R8: (6 sc, inc)×6 (48)
R9–R12: sc around (48)
(These rounds build the cheek fullness.)
R13: (6 sc, dec)×6 (42)
R14: sc around (42)
R15: (5 sc, dec)×6 (36)
R16: (4 sc, dec)×6 (30)
Stuff firmly.
R17: (3 sc, dec)×6 (24)
R18: (2 sc, dec)×6 (18)
Fasten off with a long sewing tail.
👁 Eye Backings (make 2)
With leaf green yarn:
R1: MR, 6
R2: inc×6 (12)
R3: (sc, inc)×6 (18)
R4: (2 sc, inc)×6 (24)
R5: (3 sc, inc)×6 (30)
R6: (4 sc, inc)×6 (36)
R7: (5 sc, inc)×6 (42)
Insert 24 mm safety eyes through the center.
Eye Placement
Place green eye circles between rounds 9–13 of the head
Distance between eyes: 1 stitch or touching
The expression depends on keeping them very close.
👁 Eyelids (make 2)
With dark gray:
Ch 10
Row 1: sc in 2nd ch from hook, 8 sc (9)
Row 2: dec, 5 sc, dec (7)
Row 3: sc across (7)
Sew across the upper half of each eye, curving gently downward.
🦴 Horns & Head Bumps (2 large + 6 medium)
Large Horns (2×)
With dark gray:
R1: MR, 5 sc
R2: inc, 4 sc (6)
R3–R14: sc around (6)
Lightly stuff.
Medium Bumps (6×)
With dark gray:
R1: MR, 4 sc
R2: (sc, inc)×2 (6)
R3–R6: sc around (6)
Leave unstuffed or lightly stuffed.
Placement
- 2 tall horns placed wide apart
- 3 medium bumps lined behind each horn
- All angled slightly outward and backward
🦴 Neck (tall, firm cylinder)
With dark gray:
R1: MR, 6 sc
R2: inc×6 (12)
R3: (sc, inc)×6 (18)
R4: (2 sc, inc)×6 (24)
R5–R14: sc around (24)
(This extended height creates the upright neck structure.)
R15: (2 sc, dec)×6 (18)
Stuff firmly.
🐉 Body
With dark gray:
R1: MR, 6
R2: inc×6 (12)
R3: (sc, inc)×6 (18)
R4: (2 sc, inc)×6 (24)
R5: (3 sc, inc)×6 (30)
R6: (4 sc, inc)×6 (36)
R7–R22: sc around (36)
(This creates the tall torso appropriate to the character.)
R23: (4 sc, dec)×6 (30)
R24–R26: sc around (30)
R27: (3 sc, dec)×6 (24)
R28–R29: sc around (24)
R30: (2 sc, dec)×6 (18)
Stuff firmly with a tall cylindrical shape.
🐾 Arms (make 2)
With dark gray:
R1: MR, 6
R2: (sc, inc)×3 (9)
R3–R7: sc around (9)
R8: (2 sc, inc)×3 (12)
R9–R11: sc around (12)
R12: (2 sc, dec)×3 (9)
R13–R15: sc around (9)
Light stuffing only in upper part.
Fingers (4 per hand)
Each finger:
MR, 4 sc, then 2 rounds of 4 sc.
Attach 3 in front and 1 slightly outward as a thumb.
Pose hands so they meet at the center of the chest.
🦶 Legs (make 2)
With dark gray:
R1: MR, 6
R2: inc×6 (12)
R3: (sc, inc)×6 (18)
R4–R7: sc 18
R8: (2 sc, dec)×4, 2 sc (14)
R9–R11: sc around (14)
R12: (2 sc, dec)×3 (11)
Stuff firmly.
Feet (flat, wide)
R1: MR, 8
R2: inc×8 (16)
R3: (sc, inc)×8 (24)
R4–R7: sc around (24)
R8: (2 sc, dec)×6 (18)
R9: sc around (18)
Flatten slightly when stuffing.
Toes (4 per foot)
Each toe:
MR, 5 sc, then 3–4 rounds sc around.
Sew 3 forward, 1 angled outward.
🪽 Wings (2 large, smooth-edged panels)
With dark gray:
Ch 16
Row 1: sc in 2nd ch (15)
Row 2: inc, 13 sc, inc (17)
Row 3: sc 17
Row 4: inc, 15 sc, inc (19)
Row 5: sc 19
Row 6: inc, 17 sc, inc (21)
Row 7–10: sc 21
Shape edge:
Work evenly around with sc to create a smooth outline.
Attach wings high on the back, angling slightly downward.
🌀 Tail (long taper, thick base)
With dark gray:
R1: MR, 6
R2: (sc, inc)×3 (9)
R3: (2 sc, inc)×3 (12)
R4–R14: sc around (12)
R15: (2 sc, dec)×3 (9)
R16–R24: sc around (9)
Stuff very lightly so tail curves naturally.
🔺 Tail Spikes (approx. 12)
Each spike:
Ch 5, sc 4 back.
Sew along top of tail from mid-length to fin.
🔥 Dual Tail Fins (1 red, 1 black)
Make 2 mirrored fins:
Ch 13
Row 1: sc in 2nd ch (12)
Row 2: inc, 10 sc, inc (14)
Create points:
Row 3:
- sc 5, ch 5, sc back (4)
- sc 5, ch 6, sc back (5)
- sc to end
Add one extra small point between them with ch 4, sc back.
Red fin goes on left side, black on right, tilted upward.
🧵 Assembly
- Attach neck centered on top of body.
- Attach head on neck with slight forward tilt.
- Sew on horns and medium bumps in a curved crown shape.
- Position eye backings very close together and sew.
- Add eyelids.
- Attach arms under neck so hands meet in front.
- Sew legs to lower body, flattening feet slightly.
- Attach wings high on back.
- Sew tail to the back, letting it curve toward front or side.
- Add tail spikes and dual-colored fins.
- Embroider tiny nostrils and a soft curved smile.
✨ Finishing Touches
- Keep tension tight for smooth dragon-scale texture.
- Shape cheeks and eye sockets with gentle thread sculpting.
- Adjust horns outward for personality.
- Brush lightly to remove lint.
- Position toes and fingers to match the expressive pose.
Your finished Toothless will feature large glowing eyes, a tall elegant neck, tall horns, expressive hands, wide feet, smooth wings, and a detailed tail with the iconic red fin — bringing the Night Fury’s gentle charm beautifully to life. 🖤🐉


Thank You for sharing. This is very helpful. I will be trying it soon!!❤️❤️❤️
Gracias por publicar este patron.