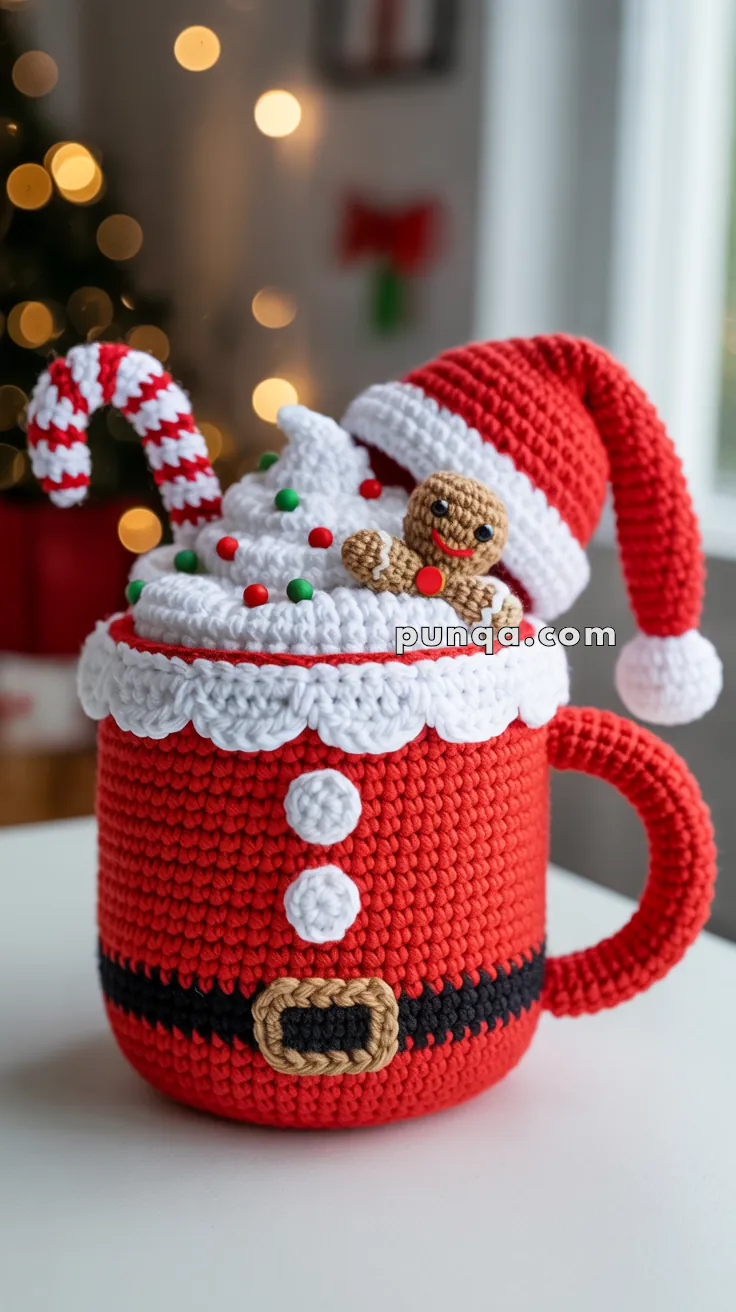
Get ready to sip in holiday style with the Amigurumi Santa Mug with Whipped Cream, a festive crochet treat that’s almost too cute to handle! 🎅☕ This cheerful red mug is dressed in Santa’s iconic suit, complete with a belt and buttons, and topped with a swirl of plush whipped cream that looks good enough to eat. Nestled into the frothy top are a striped candy cane, colorful sprinkles, and the star of the show—a tiny gingerbread man wearing a floppy Santa hat, ready to spread some sweet seasonal joy.
Perfect for crocheters who love whimsical details and holiday flair, this pattern is a merry mix of texture, color, and character. You can customize the candy cane stripes, sprinkle shades, or even give your gingerbread buddy a cheeky little smile. Whether you’re decorating your craft space, gifting a handmade keepsake, or adding a cozy touch to your Christmas display, the Santa Mug with Whipped Cream is a delightful way to stitch up holiday cheer—one jolly loop at a time! 🧶🎄
🎅☕ Amigurumi Santa Mug with Whipped Cream Crochet Pattern
This adorable Santa Mug amigurumi brings together everything we love about the holidays — a cozy Santa-suit mug, fluffy whipped cream piled high, a cute candy cane, festive sprinkles, and a tiny gingerbread man wearing an oversized floppy Santa hat. This fun project makes the perfect Christmas decoration or gift!
✨ Skill Level
Intermediate — requires working in the round, shaping, sewing small pieces, and simple color changes.
🧶 Materials
- Red yarn – mug body, handle, candy cane stripes, Santa hat
- White yarn – whipped cream, scalloped rim, hat trim, candy cane stripes, mug buttons
- Black yarn – belt
- Tan/Beige yarn – gingerbread man & belt buckle
- Green & Red yarn – sprinkles
- 8 mm safety eyes or black thread
- Black embroidery thread – mouth
- Red embroidery thread – cheeks
- Pipe cleaner or wire – candy cane + whipped cream internal spiral support
- Fiberfill stuffing
- Hook: 3.0–3.5 mm
- Tapestry needle
- Scissors
🔤 Abbreviations (US Terms)
MR – Magic Ring
sc – Single Crochet
inc – Increase
dec – Decrease
sl st – Slip Stitch
ch – Chain
FO – Fasten Off
🎅 Mug Body (Santa Suit)
Use red yarn:
R1: MR, 6 sc
R2: inc × 6 (12)
R3: (sc, inc) × 6 (18)
R4: (2 sc, inc) × 6 (24)
R5: (3 sc, inc) × 6 (30)
R6: (4 sc, inc) × 6 (36)
R7: (5 sc, inc) × 6 (42)
R8: (6 sc, inc) × 6 (48)
R9–20: sc around (48)
🔳 Black Belt Band
R21: Switch to black, sc around (48)
🔴 Upper Mug
R22–30: Switch back to red, sc around (48)
FO and weave in.
❄️ White Scalloped Rim
Attach white yarn to top edge:
R1: sc around (48)
Scallops
Repeat around:
(sl st in next st, 3 dc in next st, sl st in next st)
Creates the exact “ruffled” edge seen in the photo.
☕ Mug Handle
With red yarn:
R1: MR, 6 sc
R2–22: sc around (6), lightly stuffing as you go
Curve smoothly and sew to mug side.
🟡 Belt Buckle
With beige yarn:
Ch 14, join to ring
R1: sc around (≈ 36 stitches)
FO.
Sew to center of the black belt.
⚪ Mug Buttons (Make 2)
With white yarn:
R1: MR, 6 sc
R2: inc around (12)
FO and sew vertically above the belt.
🍥 Whipped Cream (Extremely Detailed Construction)
The whipped cream in the photo is:
✔ A tall, thick spiral
✔ With soft height (not flat)
✔ Slight overhang past one edge
✔ A smooth swirl that tapers upward
✔ Supported enough to hold candy cane + gingerbread
Here is the exact way to make it:
Step 1 — Create the Long Tube
Use white yarn:
R1: MR, 6 sc (6)
R2: (sc, inc) × 3 (9)
R3–90: sc around (9)
Notes:
- The tube must be long enough to form 4 layers of tall swirls.
- Stuff very lightly as you work — not firm, leave it “marshmallow-soft.”
- Stop stuffing the last 10 rows so the top can taper smoothly.
FO.
Step 2 — Insert Internal Support
Cut a pipe cleaner (or soft craft wire) long enough to run through the entire tube.
Insert it inside the tube so the swirl can hold shape.
Step 3 — Form the Spiral
Start from the outside edge:
- Sew the first large swirl around the rim, letting it slightly overhang one side (as in the photo).
- Build the second swirl layer directly inward.
- Add a third swirl higher, letting it rise into a cone-like shape.
- Finish with a small top swirl, angled slightly to one side.
Adjust the height so the whipped cream matches the photo — tall, soft, and fluffy, not tightly coiled.
Secure the layers with 6–8 invisible stitches each.
🍬 Candy Cane
Work in tiny color stripes.
R1: MR, 6 sc
R2–3: Red, sc around
R4–5: White, sc around
R6–7: Red
R8–9: White
Repeat until ~22 rounds.
Insert pipe cleaner and bend into cane shape.
Sew into the upper-left swirl, matching the photo.
🎄 Sprinkles (Make 6–8)
With red or green yarn:
R1: MR, 4 sc
R2: sc around (4)
FO.
Sew scattered unevenly, just like real sprinkles, on all swirl layers.
🍪 Gingerbread Man
Head (Round & Large)
With tan yarn:
R1: MR, 6 sc
R2: inc × 6 (12)
R3: (sc, inc) × 6 (18)
R4–5: sc around (18)
Stuff, FO.
Body (Small & Oval)
R1: MR, 6 sc
R2: (sc, inc) × 3 (9)
R3–4: sc around (9)
Stuff lightly, FO.
Arms (Make 2)
R1: MR, 6 sc
R2–3: sc around (6)
FO and sew to sides.
Face
• Safety eyes (8 mm) or embroider
• Black smile
• Red cheeks (French knots)
Button
Tiny red ball:
MR, 4 sc, FO.
Sew on body.
Positioning
Place the gingerbread man nestled into the whipped cream, slightly leaning, exactly like the photo.
🎅 Santa Hat (Floppy)
With red yarn:
R1: MR, 4
R2: (sc, inc) × 2 = 6
R3: (2 sc, inc) × 2 = 8
R4: (3 sc, inc) × 2 = 10
R5: sc around
R6: (4 sc, inc) × 2 = 12
R7–8: sc around
R9: (5 sc, inc) × 2 = 14
R10–11: sc around
R12: (6 sc, inc) × 2 = 16
R13–14: sc around
R15: (7 sc, inc) × 2 = 18
R16–17: sc around
R18: (8 sc, inc) × 2 = 20
R19–20: sc around
R21: (9 sc, inc) × 2 = 22
R22–28: sc around
White Brim
Switch to white:
R29–31: sc around (24)
Fold inward and stitch down to create thick, rounded brim.
Pom-Pom
R1: MR, 6
R2: inc × 6 (12)
R3–4: sc around
R5: dec × 6 = 6
FO.
Sew to hat tip.
Placement
The hat sits on the whipped cream, flopping downward, with tip pointing to the right side.
🧵 Final Assembly
- Sew whipped cream mound to mug top.
- Insert candy cane on back-left side.
- Add sprinkles across all levels.
- Tuck gingerbread man into front-right section.
- Place Santa hat tilted over the top.
- Adjust whipped cream spiral for height and fullness.
- Secure everything firmly.
🎄 Final Thoughts
This Santa Mug amigurumi is a festive showstopper — the detailed Santa outfit, fluffy whipped cream swirl, bright candy cane, colorful sprinkles, and cheerful gingerbread buddy all come together to create a magical Christmas decoration. It’s joyful, cozy, and guaranteed to make your holiday display extra special. ✨🎅☕