Step into the season with a twinkle in your toes thanks to the Holly Jolly Christmas Slippers, a festive crochet treat that’s as cozy as it is cheerful! 🎄🧦 With their bright holiday colors, playful design, and snug fit, these slippers are perfect for lounging by the fire, wrapping gifts, or sipping cocoa in style. Whether you’re decking the halls or just adding a merry touch to your winter wardrobe, these handmade slippers bring the spirit of the season to every step.
This pattern is a joyful pick for crocheters who love holiday flair and comfy creations. You can personalize your pair with jingle bells, holly appliqués, or sparkly yarn to make them truly magical. Whether you’re crafting for yourself, gifting to loved ones, or spreading handmade cheer, the Holly Jolly Christmas Slippers are a delightful way to celebrate the holidays—one merry stitch at a time! 🧶✨
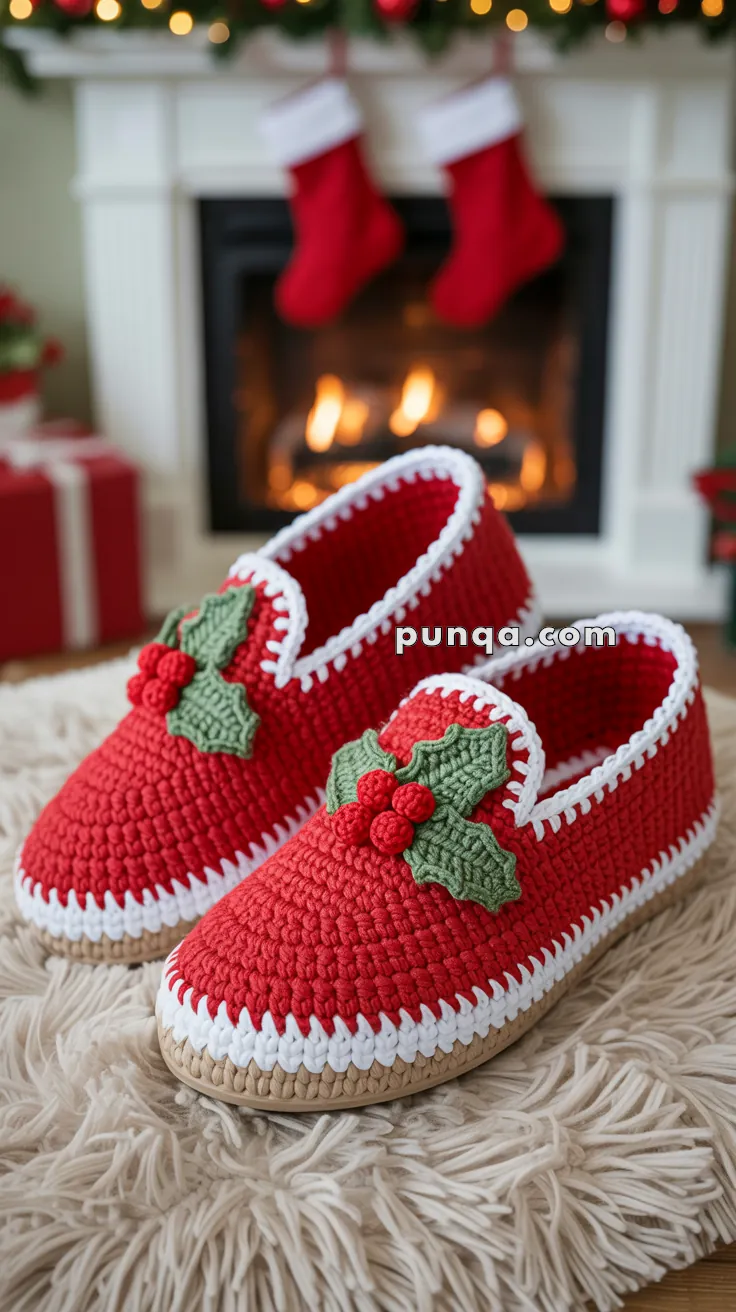
Holly Jolly Christmas Slippers Crochet Pattern (Family Sizes) 🎄
Nothing says cozy Christmas like slipping into handmade slippers by the fire! 🔥 These festive slippers feature a vibrant red body, snowy white decorative trim, and cheerful holly appliqué on top. This pattern includes sizes for kids, women, and men so you can make a matching set for the whole family. 👨👩👧👦
Skill Level 📊
Confident Beginner – mostly single crochet with easy shaping and simple appliqué work.
Finished Sizes 📏
- Kids: US 10–13 / EU 27–31 👧👦
- Women: US 5–10 / EU 35–41 👩
- Men: US 8–12 / EU 41–46 👨
Materials 🧶
Yarn
Worsted weight (#4) yarn in the following amounts per pair:
- Kids Size: 👧👦
- Red: 120 g (130 yds) ❤️
- Beige/Tan: 60 g (65 yds) 🤎
- White: 30 g (35 yds) 🤍
- Green: 10 g (scraps) 💚
- Red (for berries): 5 g (scraps) ❤️
- Women’s Size: 👩
- Red: 180 g (200 yds) ❤️
- Beige/Tan: 90 g (100 yds) 🤎
- White: 45 g (50 yds) 🤍
- Green: 15 g (scraps) 💚
- Red (for berries): 5 g (scraps) ❤️
- Men’s Size: 👨
- Red: 240 g (260 yds) ❤️
- Beige/Tan: 120 g (130 yds) 🤎
- White: 55 g (60 yds) 🤍
- Green: 15 g (scraps) 💚
- Red (for berries): 5 g (scraps) ❤️
Other Supplies 🛠️
- Crochet hook: 4.0 mm (G) 🪝
- Yarn needle 🪡
- Scissors ✂️
- Stitch markers 📍
- Polyester fiberfill (small amount for berries)
- Optional: faux leather or cork slipper soles, non-slip fabric paint
Gauge 📐
16 sc x 18 rows = 4 inches (10 cm) in single crochet
Gauge is important for proper fit. Adjust hook size if needed. ⚠️
Abbreviations (US Terms) 📝
- MR = Magic Ring
- ch = chain
- sc = single crochet
- hdc = half double crochet
- dc = double crochet
- tr = treble crochet
- inc = increase (2 sc in same st)
- dec = decrease (sc2tog)
- sl st = slip stitch
- BLO = back loop only
- FO = fasten off
- st(s) = stitch(es)
Size Reference Guide 📋
Kids Size: 👧👦
- Sole Length: 7 inches (18 cm)
- Upper Height: 2 inches (5 cm)
- Foundation Chain: Ch 18
Women’s Size: 👩
- Sole Length: 9.5 inches (24 cm)
- Upper Height: 2.5 inches (6.5 cm)
- Foundation Chain: Ch 22
Men’s Size: 👨
- Sole Length: 11 inches (28 cm)
- Upper Height: 3 inches (7.5 cm)
- Foundation Chain: Ch 26
Pattern Instructions 🎨
Part 1: Sole (Make 2 in Beige) 🤎
The sole is worked in an oval shape starting from a foundation chain.
Foundation:
- Kids: Ch 18 👧👦
- Women: Ch 22 👩
- Men: Ch 26 👨
Round 1: Sc in 2nd ch from hook, sc in each ch across until last ch. Work 3 sc in last ch (toe end). Rotate piece to work along opposite side of foundation chain. Sc in each ch across the underside of the chain until you reach the beginning. Work 1 more sc in the same st as your first sc (creating 2 sc in that corner for the heel). Join with sl st to first sc.
Round 2: Ch 1. Work 2 sc in first st, sc in each st along side until reaching the 3-sc toe group from previous round. Work 2 sc in first st of toe group, sc in middle st, 2 sc in last st of toe group. Sc along other side until heel. Work 2 sc in first heel st, sc in middle st, 2 sc in last heel st. Join with sl st.
Rounds 3–6 (Kids) / 3–8 (Women) / 3–9 (Men): Ch 1. Continue working sc around, placing increases only at toe and heel sections. Increase 4 stitches per round (2 at toe, 2 at heel) to maintain oval shape. Join each round with sl st.
Final stitch counts (approximate):
- Kids: 60–65 sts 👧👦
- Women: 75–80 sts 👩
- Men: 85–90 sts 👨
FO and weave in ends. Set aside. ✅
Part 2: Upper (Make 2 in Red) ❤️
The upper is worked in continuous rounds (do not join) as a tube that will be shaped at the toe.
Foundation: Start with a foundation chain that’s slightly smaller than the sole circumference:
- Kids: Ch 28 👧👦
- Women: Ch 36 👩
- Men: Ch 42 👨
Join with sl st to first ch to form a ring, being careful not to twist. 🔄
Round 1: Ch 1 (does not count as st), sc in each ch around. Place marker at beginning of round and move up each round. 📍 [28/36/42 sts]
Rounds 2–5 (Kids) / 2–6 (Women) / 2–7 (Men): Sc in each st around.
Toe Shaping: 👣
Mark the front center sts for toe shaping:
- Kids: Mark center front 12 sts 👧👦
- Women: Mark center front 16 sts 👩
- Men: Mark center front 18 sts 👨
Decrease Round 1: Sc until 1 st before marked section. Dec (working 1 st before marker and first marked st together). Sc across remaining marked sts until last marked st. Dec (working last marked st and st after marker together). Sc to end of round. [2 sts decreased]
Decrease Round 2: Sc around (no decreases).
Repeat decrease rounds alternating decrease/plain rounds until opening measures:
- Kids: approximately 18–20 sts around opening 👧👦
- Women: approximately 22–24 sts around opening 👩
- Men: approximately 26–28 sts around opening 👨
The toe should curve into a smooth, rounded shape. ⭕
FO, leaving a 24-inch tail for assembly.
Part 3: Assembly with Decorative White Trim 🤍
This creates the signature zigzag edge where the red upper meets the beige sole. ⚡
Step 1: Pin the red upper on top of the beige sole, matching toe and heel positions. The edges should align evenly around the perimeter. 📌
Step 2: Thread yarn needle with a 60-inch length of white yarn. Starting at center back heel, working from the outside, insert needle down through both the edge of the red upper and the edge of the beige sole (going from top to bottom). 🪡
Step 3: Bring needle back up approximately 2–3 stitches away, creating a diagonal whipstitch. Continue around the entire slipper, maintaining consistent spacing and tension. Each stitch should be visible on the outside, creating the decorative zigzag appearance. ⚡
Step 4: When you complete the circle, weave needle through several stitches to secure, then weave in end on the inside. ✅
Part 4: White Edging at Opening 🤍
With white yarn, join with sl st at center back heel of slipper opening.
Round 1: Ch 1, sc evenly around the opening (work approximately 1 sc per st, adjusting as needed to keep edge flat). Join with sl st to first sc.
Round 2: Ch 1, sc in each st around for a bold, clean edge. Join with sl st and FO.
Weave in ends. ✅
Part 5: Holly Leaf Appliqué (Make 4 total – 2 per slipper) 🍃
With green yarn: 💚
Foundation: Ch 9.
Row 1 (first side): Starting in 2nd ch from hook: sl st, sc, hdc, dc, tr in 5th ch (center point of leaf), dc, hdc, sc.
Row 2 (working along opposite side of foundation chain): Ch 1, rotate work. 🔄 Working into the underside of the foundation chain: sc, hdc, dc, tr in center ch (same ch as previous tr), dc, hdc, sc, sl st.
Adding decorative points: ✨
Round 3: Ch 1, do not turn. Working along the edge of the leaf to add natural-looking points:
- Sl st in first edge st
- Sc in next edge st
- (Hdc, ch 2, sl st in 2nd ch from hook, hdc) in next st – creates side point
- Sc in next st
- Work toward tip: hdc, dc in tip st, hdc
- (Hdc, ch 2, sl st in 2nd ch from hook, hdc) in next st – creates opposite side point
- Sc in next st
- Sl st in last st
FO, leaving a 12-inch tail for sewing. Each leaf should have 3 gentle rounded points. 🍃
Part 6: Holly Berries (Make 6 total – 3 per slipper) 🔴
With red yarn: ❤️
Round 1: MR, 6 sc in ring. Pull ring tight. [6 sts]
Round 2: Inc in each st around. [12 sts]
Round 3: Sc in each st around. [12 sts]
FO, leaving a 10-inch tail. Stuff lightly with small amount of fiberfill. Thread tail through yarn needle and weave through the stitches of the last round. Pull tight to close the opening, creating a rounded berry shape. 🔴 Secure and leave tail for sewing.
Part 7: Finishing 🎀
Step 1: Position 2 holly leaves on the vamp (top center front) of each slipper. Arrange them in a gentle “V” shape or slightly overlapping, with points facing outward. 🍃
Step 2: Using the green tails and yarn needle, sew leaves securely to the red upper, making small stitches around the center portion of each leaf while leaving the pointed edges free for dimension. 🪡
Step 3: Arrange 3 berries in a triangular cluster at the center where the leaves meet. 🔴🔴🔴
Step 4: Using the red tails, sew each berry securely to the slipper, making several stitches through the base of each berry. 🪡
Step 5: Weave in all remaining ends on the wrong side of the slipper. ✅
Optional Enhancements ✨
Non-Slip Soles: Apply fabric paint dots or strips in a pattern to the bottom of the beige sole for traction on smooth floors. Allow to dry completely (24 hours) before wearing. ⏰
Leather Soles: Trace the beige crochet sole onto faux leather, suede, or cork and cut out. ✂️ Hand-stitch or use fabric glue to attach to the bottom for extra durability and a professional finish.
Personalization: Embroider initials on the inside white cuff using contrasting thread, or add small jingle bells to the holly berries for extra festive flair. 🔔
Care Instructions 🧼
Hand wash in cool water with mild detergent. Gently squeeze out excess water without wringing. 💧 Reshape and lay flat to dry away from direct heat or sunlight. ☀️ Do not machine wash or dry. ❌
Tips for Success 💡
- Maintain Tension: Keep your tension consistent throughout for evenly shaped slippers that match in size. 👌
- Check Sole Shape: The sole should be distinctly oval, not circular. ⭕ It should be approximately 2.5–3 times longer than it is wide.
- Test Fit Before Assembly: After completing the upper but before attaching to sole, try the upper on your foot. 👣 It should fit snugly but comfortably.
- White Trim Spacing: Space your whipstitches evenly (approximately every 2–3 sts) for a uniform decorative edge. Consistency is key for a professional appearance. ⚡
- Holly Placement: Center the holly on the vamp, positioned slightly forward where it’s most visible when wearing the slippers. 🍃
- Berry Stuffing: Don’t overstuff the berries—they should be soft and slightly pliable, not hard. 🔴
- Secure Appliqués: Make extra stitches when attaching holly and berries, as these will get handling during wear. 💪
Making a Family Set 👨👩👧👦
These slippers make wonderful gifts when made as a matching family set! 🎁 Consider:
- Making them in family members’ favorite colors while keeping the holly traditional green and red 🎨
- Adding each person’s initial embroidered on the inside white cuff using contrasting thread ✍️
- Creating a gift basket with all sizes together, wrapped in festive cellophane 🎀
- Pairing with homemade hot cocoa mix ☕, Christmas cookies 🍪, or a holiday movie 🎬 for a complete cozy gift
- Making coordinating gift tags that identify each pair by size 🏷️
Troubleshooting 🔧
Upper doesn’t fit on sole: The upper should be slightly smaller than the sole circumference to create a snug fit. If too small, add 2–4 chains to foundation. If too large, reduce foundation chain by 2–4 stitches. ⚠️
Toe shaping creates a point instead of rounded shape: Make sure you’re decreasing gradually (every other round) and working decreases on both sides of the marked toe section, not at the very tip. 👣
White trim looks messy: Maintain consistent spacing and tension. If needed, rework the section. The key is even spacing and pulling each stitch to the same tightness. 🤍
Sole curls or cups: You may be increasing too much or too little. Check that you’re placing increases only at toe and heel ends, and that you’re working 4 increases per round. 📐
Conclusion 🎉
These Holly Jolly Christmas Slippers combine festive charm with practical comfort! 🎄 The structured beige sole provides support, the bold white decorative trim adds visual interest, and the cheerful holly appliqué brings seasonal cheer to every step. Whether you’re making them for yourself or as gifts, these slippers are sure to bring warmth and joy throughout the holiday season and beyond. ❤️
Happy crocheting, and may your holidays be merry and bright! 🎄✨🧶