Speak for the trees—and your yarn stash—with this whimsical Amigurumi The Lorax crochet pattern! With his bushy mustache, expressive eyebrows, and unmistakable orange fuzz, this beloved character from Dr. Seuss’s world is ready to bring a message of care and creativity to your handmade collection. Whether you’re crafting for a storybook fan, decorating a nature-themed nook, or simply love bringing iconic figures to life in yarn, The Lorax is sure to inspire smiles and thoughtful stitches. 🧶🌳🧡
Designed for personality and storytelling, this pattern invites you to explore textured yarns, bold colorwork, and fun extras like Truffula trees, a tiny stump, or even a crocheted quote banner. Customize his features to reflect your favorite version—book or movie—and add playful touches like a waving pose or a forest backdrop. Whether perched on a shelf, nestled in a gift basket, or starring in a handmade tribute to environmental kindness, this Lorax Amigurumi is a joyful and satisfying project—perfect for stitching up a little handmade wisdom, one loop at a time! 💖✨🌼
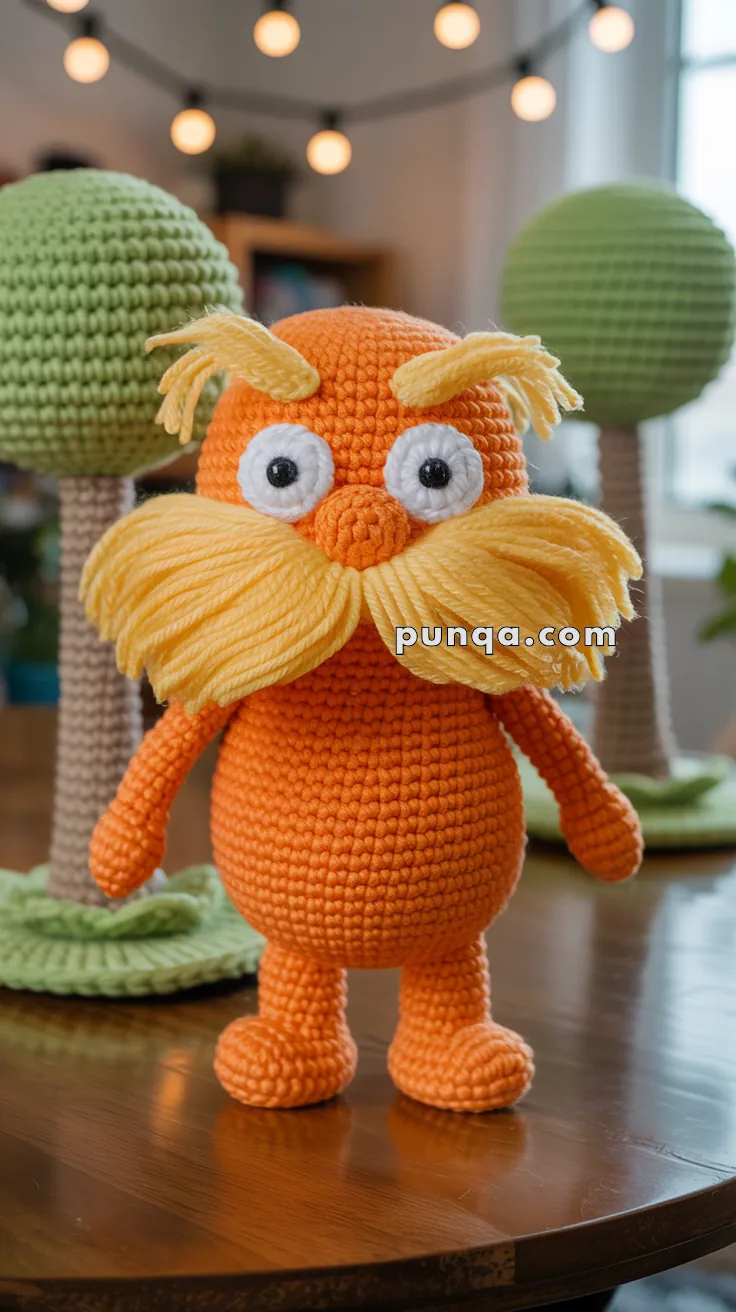
🌳 Amigurumi The Lorax Crochet Pattern
Bring a bright, cheerful forest guardian to life with this detailed amigurumi pattern. 🧡🌿
This design features a tall orange body with a full rounded belly, a smaller rounded head, huge white eyes, a softly raised orange nose, dramatic yellow eyebrows, and an extra-wide yarn-fringe mustache that spreads across the face and upper chest. Short legs, broad rounded feet, and long relaxed arms complete the charming silhouette.
The head and body are worked continuously as one piece, with a subtle neck shaping between them. This creates a clean finish while keeping the body visibly fuller than the head.
✨ Skill Level
Intermediate
This project includes:
- Continuous head-and-body shaping
- Invisible increases and decreases
- Oval foot construction
- Separate eye and nose appliqués
- Yarn-fringe mustache styling
- Bushy eyebrow construction
- Facial embroidery
- Standing-balance assembly
📏 Finished Size
Using worsted-weight yarn with a 3.25–3.5 mm crochet hook, the finished figure measures approximately:
- 27–30 cm (10½–12 in) tall
- 15–17 cm (6–6¾ in) across the widest part of the belly
- 13–15 cm (5–6 in) across the mustache after trimming
The final size may vary depending on yarn, hook size, tension, stuffing, and fringe length.
🧶 Yarn Requirements
Use smooth worsted-weight cotton, cotton-blend, or acrylic yarn for the crocheted pieces. A softer acrylic yarn works especially well for the mustache and eyebrows.
- 🧡 Bright orange — 190–220 g
- 💛 Warm golden yellow — 55–70 g
- 🤍 White — 15–20 g
- 🖤 Black — 5–8 g
Polyester fiberfill — approximately 180–230 g
The yellow amount includes the full yarn-fringe mustache and eyebrows. Add another 10–15 g when making an especially dense mustache.
🧵 Materials
- 3.25–3.5 mm crochet hook
- Two 10–12 mm black safety eyes, optional
- Polyester fiberfill
- Tapestry needle
- Fine embroidery needle
- Stitch markers
- Pins for positioning
- Scissors
- Small comb or wide-tooth comb
- Optional plastic pellets for standing stability
- Optional plastic canvas for the foot soles
- Optional pet slicker brush for fluffing the eyebrows
Safety eyes and weighted pellets are not suitable for children under three years old. Use embroidered pupils and omit weighted materials when necessary.
🔤 Abbreviations — US Terms
- MR — Magic Ring
- sc — Single Crochet
- inc — Increase: 2 sc in the same stitch
- dec — Invisible Decrease
- sl st — Slip Stitch
- ch — Chain
- hdc — Half Double Crochet
- BLO — Back Loop Only
- FLO — Front Loop Only
- FO — Fasten Off
- st — Stitch
Work in continuous rounds unless instructed otherwise.
🟠 Head and Body
The head and body are worked in one continuous piece from the bottom upward.
The lower section forms a large egg-shaped belly. The stitch count then decreases to create a subtle neck before increasing again for the smaller rounded head.
Using orange yarn:
Body Base
R1
MR 6.
(6)
R2
inc ×6.
(12)
R3
(1 sc, inc) ×6.
(18)
R4
(2 sc, inc) ×6.
(24)
R5
(3 sc, inc) ×6.
(30)
R6
(4 sc, inc) ×6.
(36)
R7
(5 sc, inc) ×6.
(42)
R8
(6 sc, inc) ×6.
(48)
R9
(7 sc, inc) ×6.
(54)
R10–23
sc around.
(54)
Begin stuffing firmly.
Keep the lower center broad and gently flatten the bottom against a table as you stuff.
R24
(7 sc, dec) ×6.
(48)
R25–27
sc around.
(48)
R28
(6 sc, dec) ×6.
(42)
R29–31
sc around.
(42)
R32
(5 sc, dec) ×6.
(36)
R33–35
sc around.
(36)
These rounds create the upper torso and narrow shoulder area.
Continue stuffing firmly.
Neck and Head Transition
R36
(4 sc, dec) ×6.
(30)
R37
sc around.
(30)
R38
(4 sc, inc) ×6.
(36)
R39
(5 sc, inc) ×6.
(42)
The increases begin the rounded head.
Head
R40–49
sc around.
(42)
The eyes are separate appliqués, so no safety eyes are inserted directly into the head at this stage.
R50
(5 sc, dec) ×6.
(36)
R51
(4 sc, dec) ×6.
(30)
R52
(3 sc, dec) ×6.
(24)
Stuff the head firmly.
Keep the forehead rounded and the face slightly flatter.
R53
(2 sc, dec) ×6.
(18)
R54
(1 sc, dec) ×6.
(12)
R55
dec ×6.
(6)
FO and close.
✨ Shaping the Head and Body
Massage the stuffing so that:
- The lower body is broad and egg-shaped.
- The bottom is slightly flat.
- The shoulders are narrower than the belly.
- The head is round but visibly smaller than the body.
- The transition between the torso and head remains subtle.
- The face has a smooth surface for attaching the eyes and nose.
The widest part of the belly should sit below the middle of the finished figure.
👀 White Eyes — Make 2
The eyes are large, flat white circles with small black centers.
Using white yarn:
R1
MR 6.
(6)
R2
inc ×6.
(12)
R3
(1 sc, inc) ×6.
(18)
R4
sc around.
(18)
FO, leaving a long sewing tail.
Flatten each eye into a smooth circle.
🖤 Pupils — Make 2
Using black yarn:
R1
MR 6.
(6)
R2
inc ×6.
(12)
FO.
Alternatively, insert a 10–12 mm safety eye through the center of each white eye before attaching it.
Sew each black pupil to the center of a white circle.
Position the pupils slightly toward the inner lower sides for an expressive, wide-eyed look.
Add a tiny white highlight stitch to each pupil if desired.
🪡 Attaching the Eyes
Position the eyes on the front of the head between approximately Body Rounds 42 and 47.
The eyes should:
- Sit close together
- Remain level
- Be partly framed by the eyebrows above
- Sit directly above the nose
- Remain fully visible above the mustache
Leave approximately one or two stitches between their inner edges.
Pin both eyes before sewing either one permanently.
👃 Rounded Orange Nose
The nose is a dimensional orange oval placed between the eyes and directly above the mustache.
Using orange yarn:
R1
MR 6.
(6)
R2
inc ×6.
(12)
R3–5
sc around.
(12)
R6
dec ×6.
(6)
Stuff lightly.
FO, leaving a long sewing tail.
Shape the nose into a short vertical oval.
Sew it between and slightly below the eyes.
The lower portion of the nose should overlap the center of the mustache.
💛 Mustache Base
A crocheted base keeps the fringe secure and makes it easier to shape the mustache evenly.
Using yellow yarn:
Row 1
Ch 25.
Starting in the second chain, sc across.
(24)
Rows 2–3
Ch 1, turn, sc across.
(24)
FO, leaving a long sewing tail.
Mark the center between Stitches 12 and 13.
This center will sit directly beneath the nose.
🧔 Full Yarn-Fringe Mustache
Cut approximately 48–60 strands of yellow yarn, each measuring 16–18 cm (6¼–7 in).
Each strand will be folded in half when attached.
Attaching the Fringe
- Insert the hook beneath one stitch of the mustache base.
- Fold one strand in half.
- Pull the folded loop through the stitch.
- Pass the loose ends through the loop.
- Pull gently to secure the lark’s head knot.
- Continue across the entire base.
Attach two strands to some stitches for extra fullness.
Add a second row of fringe through the stitches of Row 2 when a denser mustache is desired.
✂️ Shaping the Mustache
Divide the fringe evenly at the center.
Comb the left half toward the left and the right half toward the right.
Trim each side into a broad teardrop or wing shape:
- Shortest near the center beneath the nose
- Full and wide through the middle
- Slightly tapered at the outer ends
- Long enough to extend beyond the sides of the head
- Curved gently downward over the upper body
Do not trim the mustache into a straight horizontal line.
The outer ends should appear soft, rounded, and slightly uneven.
Tack a few inner strands beneath the nose so the center part remains visible.
🪡 Attaching the Mustache
Pin the mustache base horizontally across the lower face.
The center should sit directly beneath the nose.
The fringe should spread across the cheeks and upper chest.
Sew the crocheted base securely to the head using yellow yarn.
Avoid sewing through the loose fringe strands.
After sewing, arrange the strands over the base so the crocheted strip is hidden.
💛 Eyebrow Bases — Make 2
Using yellow yarn:
Row 1
Ch 8.
Starting in the second chain, sc across.
(7)
Row 2
Ch 1, turn, sc across.
(7)
FO, leaving a sewing tail.
✨ Bushy Eyebrows
Cut approximately 12–16 yellow strands per eyebrow, each measuring 7–9 cm (2¾–3½ in).
Attach the strands to each eyebrow base using lark’s head knots.
Add more strands at the outer half of each base for fuller, dramatic ends.
Comb and trim the strands so that:
- The inner portion is short
- The brows become longer toward the outside
- The outer strands curve upward and outward
- Each eyebrow remains thick and clearly separated from the eyes
A few strands may be left intentionally longer for a lively, untamed appearance.
🪡 Attaching the Eyebrows
Position each eyebrow above an eye.
The inner ends should sit slightly lower than the outer ends.
Angle the brows upward toward the sides of the head.
Sew the crocheted bases securely while leaving the fringe free.
Fluff the yarn gently with your fingers or a comb.
👄 Optional Mouth
Most of the mouth is hidden beneath the large mustache.
Using black embroidery thread, stitch a small shallow curve directly beneath the center of the mustache.
Only a tiny portion should remain visible.
Do not make the mouth wider than the nose.
💪 Arms — Make 2
The arms are long, narrow, and gently tapered, with rounded hands.
Using orange yarn:
R1
MR 6.
(6)
R2
inc ×6.
(12)
R3–6
sc around.
(12)
R7
(2 sc, dec) ×3.
(9)
R8–17
sc around.
(9)
Stuff the hand and lower arm lightly.
Leave the upper four rounds almost unstuffed so the arm hangs naturally.
Flatten the upper opening.
FO, leaving a long sewing tail.
🪡 Attaching the Arms
Position the arms on the upper sides of the body between approximately Body Rounds 26 and 32.
Angle them:
- Slightly outward at the shoulders
- Downward beside the belly
- Very gently inward at the hands
The arms should reach to approximately the widest part of the belly.
Sew through the flattened upper openings.
🦵 Lower Legs — Make 2
The legs are short and sturdy.
Using orange yarn:
R1
MR 6.
(6)
R2
inc ×6.
(12)
R3
(1 sc, inc) ×6.
(18)
R4–8
sc around.
(18)
R9
(4 sc, dec) ×3.
(15)
R10–12
sc around.
(15)
Stuff firmly.
Flatten the upper opening.
FO, leaving a long sewing tail.
🦶 Rounded Feet — Make 2
The feet are broad, flattened ovals with raised rounded toes.
Using orange yarn:
R1
Ch 8.
Starting in the second chain:
6 sc, 3 sc in the final chain.
Continue along the opposite side:
5 sc, inc.
(16)
R2
inc, 5 sc, 3 inc, 5 sc, 2 inc.
(22)
R3
(3 sc, inc) ×5, 2 sc.
(27)
R4–7
sc around.
(27)
R8
(7 sc, dec) ×3.
(24)
R9
(6 sc, dec) ×3.
(21)
Stuff firmly, keeping the front broad and the sole slightly flat.
FO, leaving a long sewing tail.
Optional: insert a plastic-canvas oval inside the sole before closing.
🪡 Joining the Legs and Feet
Sew one lower leg to the back upper section of each foot.
The foot should extend forward beyond the leg.
Keep the soles flat and the rounded toe ends facing forward.
Reinforce the seam thoroughly.
🧷 Attaching the Legs
Position the legs beneath the body, slightly apart.
The feet should:
- Rest completely on the display surface
- Point mostly forward
- Angle slightly outward
- Extend beyond the front of the belly
- Support the body without the figure leaning
Pin both legs before sewing.
Add a small hidden stitch between each leg and the lower body if additional support is required.
🪨 Optional Weighted Base
For improved standing stability:
- Fill a small fabric pouch with plastic pellets.
- Tie or sew the pouch closed.
- Place it in the bottom of the body before adding the remaining stuffing.
- Surround it completely with fiberfill.
Do not pour loose pellets directly into the crocheted body.
🪡 Assembly Order
For the cleanest result, assemble the pieces in this order:
- Finish and stuff the head-and-body piece.
- Attach the white eyes.
- Add the black pupils.
- Sew on the orange nose.
- Attach the mustache base and arrange the fringe.
- Sew on the eyebrow bases and style the strands.
- Embroider the optional mouth.
- Attach the arms.
- Sew the legs to the feet.
- Attach the completed legs beneath the body.
- Adjust the stuffing and standing balance.
- Trim the mustache and eyebrows last.
✨ Final Shaping
- Keep the body visibly larger than the head.
- Maintain a narrow transition between the torso and head.
- Position the eyes close together.
- Center the nose exactly between the eyes.
- Divide the mustache cleanly beneath the nose.
- Spread the mustache broadly across the face and chest.
- Lift the outer eyebrow strands upward.
- Let the arms hang naturally beside the belly.
- Keep the legs short.
- Flatten the foot soles.
- Check the figure from the front, sides, and back before securing the final seams.
💡 Helpful Tips
- Use acrylic yarn for softer, fuller fringe.
- Steam is not necessary for the facial hair; finger-combing is usually enough.
- Avoid brushing cotton yarn aggressively because it may split.
- Cut the fringe longer than needed and trim it gradually.
- Pin both eyes before sewing either one.
- Add the nose only after confirming the eye positions.
- Reinforce the feet when the finished character will be displayed standing.
- Stuff the body firmly, but avoid stretching the stitches.
- Keep the head slightly softer than the belly for easier facial shaping.
- Save leftover yellow strands for filling sparse areas of the mustache.
🧼 Care Instructions
Spot clean gently with a lightly damp cloth.
Allow the amigurumi to air dry completely.
Comb the mustache and eyebrows gently after cleaning or storage.
Avoid machine washing when plastic canvas, pellets, or safety eyes are used.
Store upright without crushing the facial fringe.
🌲 Display Ideas
This bright forest guardian looks especially charming beside:
- Crocheted fantasy trees
- Colorful pom-pom flowers
- Woodland-themed books
- Nature-inspired nursery décor
- Environmental education displays
- Whimsical spring decorations
A small wooden platform can provide additional standing stability.
🌟 Final Thoughts
Your cheerful forest guardian is ready to speak for the trees. 🌳🧡
With his tall egg-shaped body, smaller rounded head, wide white eyes, raised orange nose, wild golden eyebrows, enormous flowing mustache, long relaxed arms, short legs, and rounded feet, this expressive amigurumi is full of warmth and woodland personality.
Happy Crocheting! 🧶🌿


Gracias , por el patrón, esta muy hermoso.🥰