Pack your marmalade sandwiches and grab your crochet hook—this Amigurumi Paddington Bear pattern is ready to take you on a charming crafting adventure! With his iconic red hat, blue coat, and lovable expression, Paddington comes to life in yarn form, bringing storybook nostalgia and handmade warmth to your collection. Whether you’re creating a gift for a little reader, decorating a nursery, or simply indulging in a cozy project, this bear is sure to become a treasured companion. 🧶🐻🧥
Designed for detail and delight, this pattern invites you to explore textured stitches, expressive features, and fun extras like a tiny suitcase, buttons, or even a crocheted marmalade jar. Customize his outfit with classic colors or add playful touches to reflect your own creative flair. Whether perched on a shelf, nestled in a gift basket, or starring in a literary-themed display, this Paddington Bear Amigurumi is a joyful and satisfying project—perfect for stitching up a little handmade adventure, one loop at a time! 💖✨🍊
🧸 Paddington Bear Amigurumi Crochet Pattern
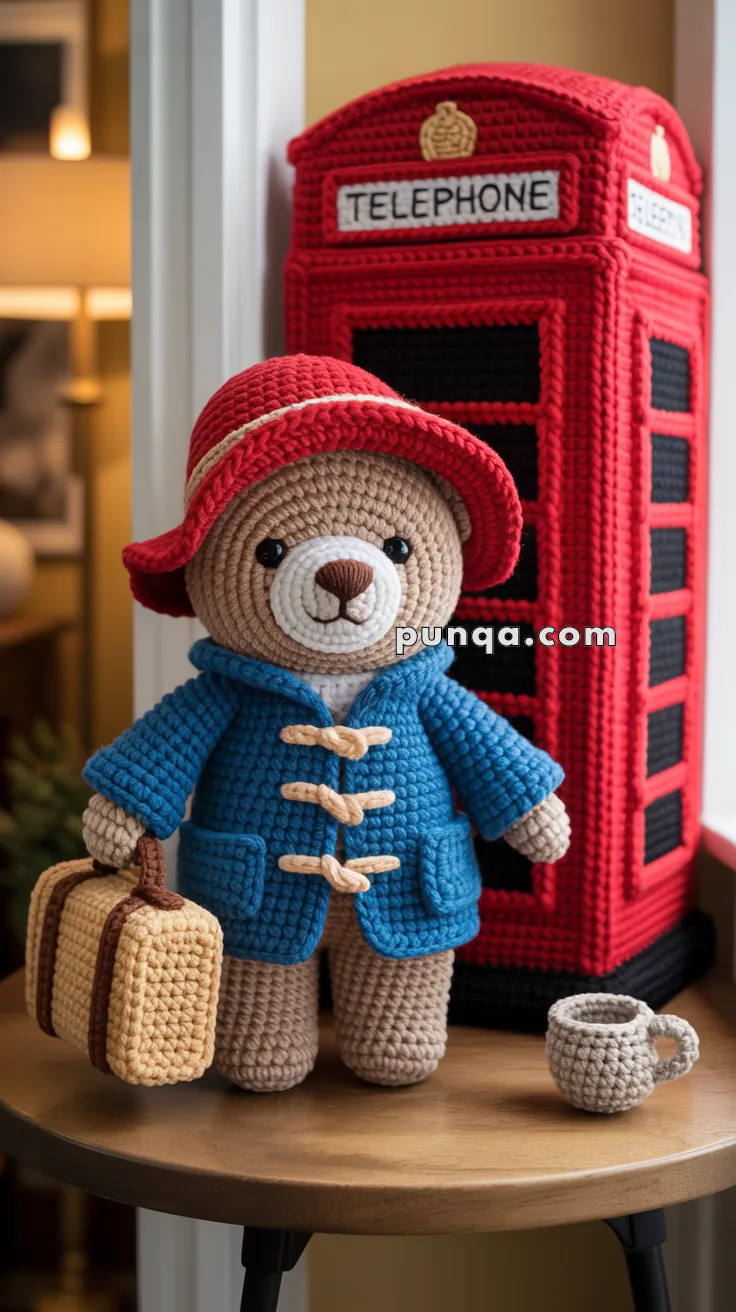
There’s something irresistibly charming about creating a classic storybook character in crochet form. This Paddington Bear amigurumi brings that beloved warmth to life with his bright blue duffle coat, red hat, tiny suitcase, and a beautifully detailed London telephone booth. Whether you’re a fan of the iconic bear or simply adore whimsical projects, this pattern offers an enjoyable and rewarding make with a delightful display result.
✨ Skill Level
Intermediate — Includes construction, flat and round crochet, shaping, simple colorwork, and small accessory assembly.
📏 Finished Size
- Paddington Bear: 28–30 cm tall
- Phone Booth: 35 cm tall
- Suitcase: 7–8 cm wide
- Cup: 3.5–4 cm tall
🧶 Materials
DK / Light Worsted Yarn
- Light brown – bear head, body, arms, legs
- Dark brown – nose, suitcase trim
- White – muzzle, cup interior, telephone sign
- Red – hat, phone booth
- Blue – coat
- Black – eyes, embroidery, phone booth windows
- Cream – toggles, hat band, suitcase body
- Yellow – telephone booth crest
Tools & Notions
- 2.5–3.0 mm crochet hook
- 12 mm black safety eyes
- Fiberfill stuffing
- Yarn needle
- Scissors
- Optional: Plastic canvas/cardboard for structure
🧵 Abbreviations
MR — magic ring
sc — single crochet
inc — increase
dec — invisible decrease
sl st — slip stitch
ch — chain
FO — fasten off
BLO — back loop only
FLO — front loop only
(Worked in continuous rounds unless noted.)
🧸 PADDINGTON BEAR
Head — Light Brown
R1: MR, 6 sc
R2: inc ×6 (12)
R3: (sc, inc) ×6 (18)
R4: (2 sc, inc) ×6 (24)
R5: (3 sc, inc) ×6 (30)
R6: (4 sc, inc) ×6 (36)
R7–14: 36 sc
Place eyes between R10–R11, spaced 6–7 sts apart.
R15: (4 sc, dec) ×6 (30)
R16: (3 sc, dec) ×6 (24)
R17: (2 sc, dec) ×6 (18)
Stuff firmly.
R18: (sc, dec) ×6 (12)
R19: dec ×6 (6)
FO.
Muzzle — White
R1: MR, 6 sc
R2: inc ×6 (12)
R3: (sc, inc) ×6 (18)
R4–5: 18 sc
Lightly stuff; sew centered below eyes.
Embroider:
- Triangular dark brown nose
- Simple curved smile in dark brown
Ears (Make 2) — Light Brown
R1: MR, 6 sc
R2: (sc, inc) ×3 (9)
R3: 9 sc
Flatten; sew between R7–9.
🧸 Body — Light Brown
R1: MR, 6 sc
R2: inc ×6 (12)
R3: (sc, inc) ×6 (18)
R4: (2 sc, inc) ×6 (24)
R5–12: 24 sc
R13: (2 sc, dec) ×6 (18)
R14: 18 sc
Stuff and sew to head.
👐 Arms (Make 2) — Light Brown → Blue Sleeves
R1: MR, 6 sc
R2: inc ×6 (12)
R3–5: 12 sc (light brown)
R6: switch to blue, 12 sc
R7–10: 12 sc
Lightly stuff paw only; leave long tail.
Arms will be inserted into sleeves later.
🦵 Legs (Make 2) — Light Brown
R1: MR, 6 sc
R2: inc ×6 (12)
R3–7: 12 sc
Stuff firmly; sew slightly angled forward to bottom of body.
🎩 Red Hat with Cream Band
Hat Crown
R1: MR, 6 sc
R2: inc ×6 (12)
R3: (sc, inc) ×6 (18)
R4: (2 sc, inc) ×6 (24)
R5: (3 sc, inc) ×6 (30)
R6: switch to cream, 30 sc
R7: switch back to red, 30 sc
R8–11: 30 sc
Brim (Wide, Downturned)
R12 (FLO): (4 sc, inc) ×6 (36)
R13–15: 36 sc
FO.
Shape brim downward using steam or pinning.
🧥 BLUE DUFFLE COAT (Open Front)
This coat is constructed flat in rows and then assembled to create two wide front panels, a roomy body, long sleeves, large pockets, and classic toggles.
Coat Back Panel
Ch 26
Row 1: sc in 2nd ch, sc 24 (25)
Rows 2–22: ch 1, sc 25
FO.
Left Front Panel
Ch 14
Row 1: sc in 2nd ch, sc 12 (13)
Rows 2–22: ch 1, sc 13
FO.
Right Front Panel
Same as left.
Join Panels
Align front panels beside back panel.
Sew shoulder seams: 3–4 sts per side.
Coat Body Assembly
Attach yarn at side of coat and crochet down the edges joining side seams:
- Seam height = 18 rows
- Keep bottom 4 rows open for flare
Sleeves (Make 2)
Attach yarn at armhole.
R1: Crochet evenly around armhole (approx. 14 sc)
R2–8: sc around
R9–10: slightly widen: (sc, inc) ×7 (21)
R11–12: 21 sc
FO.
Insert arms and stitch lightly inside sleeves.
Collar (Large, Folded)
Attach blue yarn at neckline.
Row 1: sc evenly along neck (approx. 24 sts)
Row 2–6: ch 1, sc across
FO and fold collar outward.
Wide collar matches the image precisely.
Front Pockets (2)
Ch 7
Row 1: sc 6
Rows 2–4: sc 6
FO.
Sew pockets to each front panel approx. 4 rows below armhole.
Toggles & Loops
Loops (Left Panel)
Make 3 chunky horizontal loops:
Ch 10, sl st back across to thicken.
Sew vertically along panel.
Toggles (Right Panel)
Make 3 toggles:
Ch 8 → sc across for a thick bar shape.
Sew across from loops.
🧳 SUITCASE (Small, Square Shape)
Body — Cream
R1: Ch 10
Row 1: sc 9
Rows 2–7: ch 1, sc 9
Make 2 identical panels.
Side Strip
Ch 26
Row 1: sc 25
Rows 2–3: sc 25
This forms the wall of the suitcase.
Assemble by sewing strip around one panel, then closing with second panel.
Trim — Dark Brown
Ch long enough to border entire suitcase front.
sc back along chain.
Sew along all edges.
Handle — Dark Brown
Ch 12
Row 1: sc 11
Attach ends 2 sts apart for arched handle.
(No white label — matches the image.)
☕ TEA CUP (Small & Chunky)
Cup — Cream
R1: MR, 6 sc
R2: inc ×6 (12)
R3: (sc, inc) ×6 (18)
R4–5: 18 sc
R6: BLO, 18 sc (creates rim edge)
FO.
Handle — Cream
Ch 6
Row 1: sc 5
Sew both ends to cup side.
Compact and chunky as pictured.
☎️ LONDON TELEPHONE BOOTH
Side Panels (4) — Red
Ch 26
Row 1: sc 25
Rows 2–52: sc 25
Tall rectangular panels.
Windows (4 Large Panels) — Black
Make 4 rectangles:
Ch 14
Row 1: sc 13
Rows 2–10: sc 13
Sew two windows top, two bottom, on front-facing panel.
Telephone Sign — White
Ch 18
Rows 1–4: sc 17
Embroidery: “TELEPHONE” in black
Sew above windows.
Crest — Yellow
R1: MR, 6 sc
R2: inc ×6 (12)
FO and shape into small badge.
Sew above sign.
Base — Red
R1: MR, 6
R2: inc ×6 (12)
R3: (sc, inc) ×6 (18)
R4: (2 sc, inc) ×6 (24)
R5: (3 sc, inc) ×6 (30)
R6–7: 30 sc
Forms flat base.
Roof (Arched)
R1: MR, 6
R2: inc ×6 (12)
R3: (sc, inc) ×6 (18)
R4: (2 sc, inc) ×6 (24)
R5: (3 sc, inc) ×6 (30)
R6–7: 30 sc
R8: (4 sc, dec) ×5 (25)
Soft downward curve.
FO.
Assembly
- Seam all 4 booth panels together
- Insert optional plastic canvas
- Attach base
- Attach arched roof
- Add windows, sign, crest
🎉 Final Assembly
- Place coat on bear
- Insert arms into sleeves
- Put hat on head (slightly forward tilt)
- Sew suitcase to one paw
- Place cup beside bear
- Set booth behind for perfect display
💛 Enjoy Your Classic Paddington Display
With his warm expression, tidy shoes, cozy coat, and iconic accessories, this Paddington Bear captures every bit of the charm that has made him a beloved character for generations. Whether he becomes a collector’s piece or a heartfelt handmade gift, he’s certain to bring smiles for years to come.