Hop into storybook charm with this Amigurumi Peter Rabbit crochet pattern! Inspired by the mischievous little bunny from Beatrix Potter’s beloved tales, this adorable character comes to life with his signature blue jacket, expressive eyes, and playful pose. Whether you’re crafting a nostalgic gift, decorating for spring, or adding to your literary-themed collection, Peter Rabbit is sure to bring a touch of whimsy and wonder to your yarn adventures. 🧶🐰📚
Designed for detail and delight, this pattern invites you to explore soft yarns, gentle shaping, and sweet extras like a tiny satchel, garden veggies, or even a miniature carrot patch. Customize his look with embroidered features, textured fur, or accessories that reflect your favorite scenes. Whether perched on a shelf, nestled in a gift basket, or starring in a handmade garden display, this Peter Rabbit Amigurumi is a joyful and satisfying project—perfect for stitching up a little handmade mischief, one loop at a time! 💖✨🥕
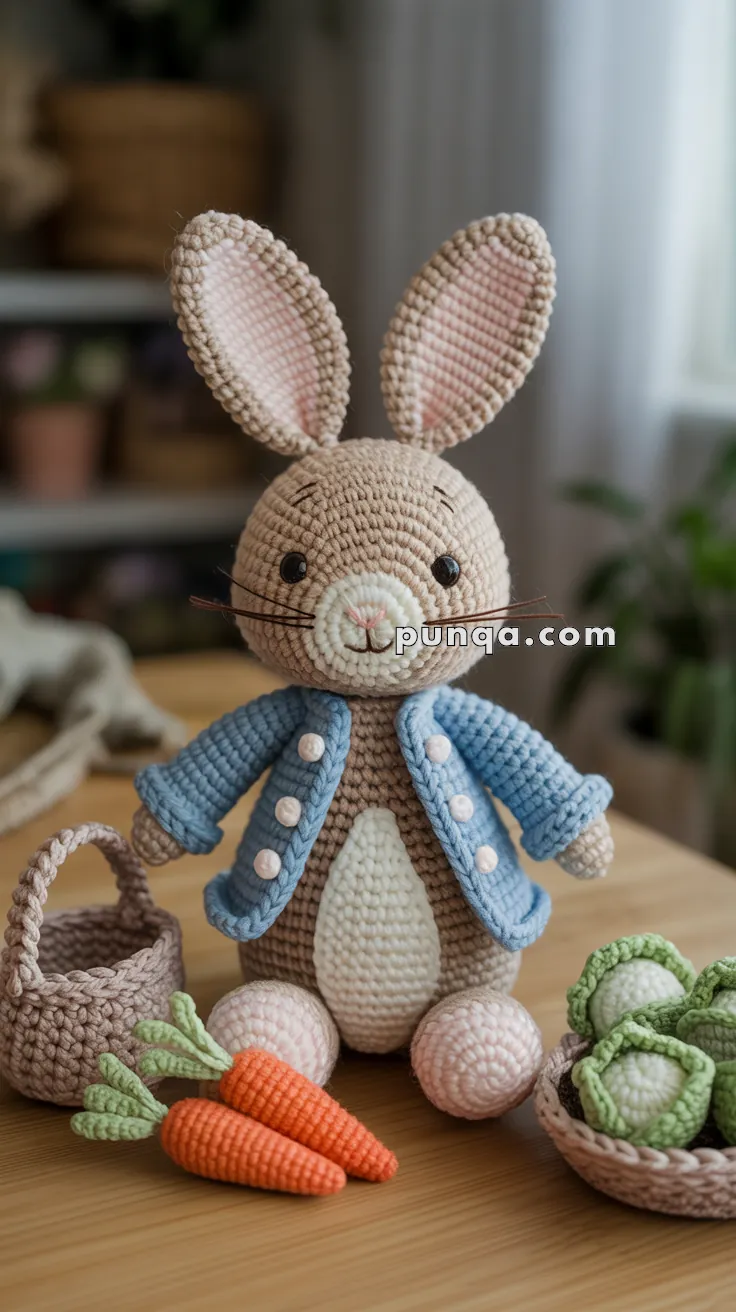
🐰 Amigurumi Peter Rabbit & Garden Set Crochet Pattern
Step into a whimsical tale with this charming amigurumi Peter Rabbit inspired by classic storybook characters! Complete with a buttoned blue jacket, floppy ears, and a basket full of veggies (carrots and cabbages!), this delightful bunny is perfect for springtime gifts, nursery decor, or collectors of literary amigurumi. Let’s hop into the details!
✨ Skill Level
Intermediate to Advanced – Includes advanced shaping, seamless jacket construction, and precise assembly.
📏 Finished Size
Peter Rabbit: approx. 25–28 cm (10–11 inches)
Carrots: approx. 6 cm (2.5 inches)
Cabbages: approx. 5 cm (2 inches)
🧶 Materials
Yarn (DK / light worsted weight):
- Beige / tan – body, head, outer ears
- Cream / off-white – belly panel, muzzle
- Light pink – inner ears, foot pads
- Light blue – jacket
- White – buttons, cabbage base
- Orange – carrots
- Light green – carrot tops, cabbage leaves
- Light brown / taupe – basket
Tools & notions:
- 2.5 mm crochet hook
- 8 mm safety eyes
- Tapestry needle
- Stitch marker
- Polyester stuffing
- Brown embroidery thread (whiskers, eyebrows)
- Pink embroidery thread (nose, cheeks)
- Optional: blush or chalk for cheeks
🧵 Abbreviations (US Terms)
MR – Magic Ring
sc – Single Crochet
inc – Increase
dec – Invisible Decrease
ch – Chain
sl st – Slip Stitch
hdc – Half Double Crochet
dc – Double Crochet
FO – Fasten Off
BLO – Back Loop Only
FLO – Front Loop Only
🐰 Peter Rabbit – Main Body Parts
Head (Beige)
R1: MR, 6 sc (6)
R2: inc x6 (12)
R3: (1 sc, inc) x6 (18)
R4: (2 sc, inc) x6 (24)
R5: (3 sc, inc) x6 (30)
R6: (4 sc, inc) x6 (36)
R7–15: sc around (36)
Insert safety eyes between R11–12, about 7–8 stitches apart.
R16: (4 sc, dec) x6 (30)
R17: (3 sc, dec) x6 (24)
R18: (2 sc, dec) x6 (18)
Stuff firmly
R19: (1 sc, dec) x6 (12)
R20: dec x6 (6)
FO and close.
Muzzle (Cream)
R1: MR, 6 sc (6)
R2: inc x6 (12)
R3: (1 sc, inc) x6 (18)
R4: sc around (18)
FO, leave long tail.
Lightly stuff and sew centered below the eyes.
Embroider a small pink inverted triangle nose and a short vertical smile line.
Ears (Make 2)
Outer Ear (Beige)
R1: MR, 6 sc (6)
R2: (1 sc, inc) x3 (9)
R3: (2 sc, inc) x3 (12)
R4: (3 sc, inc) x3 (15)
R5–18: sc around (15)
Flatten and sc across top. FO.
Inner Ear (Pink)
Work same as outer ear but stop after R14.
Sew pink piece onto beige piece.
Pinch the base slightly and sew ears onto the head angled outward for a floppy look.
🧸 Body (Beige with Cream Belly Panel)
R1: MR, 6 sc (6)
R2: inc x6 (12)
R3: (1 sc, inc) x6 (18)
R4: (2 sc, inc) x6 (24)
R5: (3 sc, inc) x6 (30)
R6: (4 sc, inc) x6 (36)
R7–9: sc around (36)
From R10–21:
Work 12 center front stitches in cream for the belly panel, remaining stitches in beige.
R22: (4 sc, dec) x6 (30)
R23–24: sc around (30)
R25: (3 sc, dec) x6 (24)
Stuff firmly
R26: (2 sc, dec) x6 (18)
R27: (1 sc, dec) x6 (12)
FO, leave long tail for attaching head.
🖐 Arms (Make 2 – Beige)
R1: MR, 6 sc (6)
R2: (1 sc, inc) x3 (9)
R3–15: sc around (9)
Stuff lightly
Flatten opening and FO.
Do not attach yet – arms will be sewn after the jacket is put on.
🦶 Legs & Feet (Make 2)
Foot (Beige Oval)
Ch 6, work around chain to form oval:
R1: 12 sts
R2: 18 sts
R3: 24 sts
R4: BLO sc around (24)
R5–7: sc around (24)
R8: (6 sc, dec) x2 (18)
R9: (5 sc, dec) x2 (14)
Pink Foot Pad (worked in FLO of R3)
(sl st, ch 1, 2 dc, ch 1, sl st) in each front loop section to create a soft textured pad.
Leg:
R10–18: sc around (14)
Stuff firmly
FO, leave tail.
Sew legs to the lower front of the body for sitting pose.
👕 Peter’s Blue Jacket (Wearable Construction)
Back Panel
Ch 22
Rows 1–16: sc across (21)
FO.
Front Panels (Make 2)
Ch 11
Rows 1–16: sc across (10)
FO.
Sleeves (Make 2 – Open, Not Magic Ring)
Ch 19
Row 1: sc across (18)
Rows 2–10: sc across
FO.
Fold into a tube and sew long edge, leaving both ends open.
Collar
Ch 26
Rows 1–2: sc across
FO.
Jacket Assembly
Sew front panels to back panel at shoulders only, leaving armholes open.
Attach sleeves into armholes.
Sew collar around neckline.
Make 4 buttons:
MR, 5 sc, sl st. FO.
Sew buttons evenly down the front right panel.
How to Dress Peter (Correct Method)
- Slide jacket onto the body
- Insert arms through sleeves
- Sew arms to body
- Attach head last
This creates true wearable sleeves and matches the photo perfectly.
🥕 Carrots (Make 2–3)
Body (Orange):
MR 5 → increase gradually to 13 sts
R7–11: sc around
Stuff
Decrease to close.
Leaves (Light Green, 3–4 per carrot):
Ch 8, sl st, sc, hdc, dc, hdc, sc, sl st.
Sew onto top.
🥬 Cabbage (Make 2–3)
Base (White/Cream):
MR 6 → inc to 24
Stuff lightly
Dec to 18
FO.
Outer leaves (Green, 5–6 pieces):
Small ruffled circles sewn overlapping around the base.
🧺 Basket
Base:
MR 6 → inc to 30
R6: BLO sc around
R7–10: sc around.
Handle:
Ch 25, attach to opposite sides, sc back across.
✏️ Facial Details
- Brown embroidered eyebrows
- Three whiskers per cheek
- Pink triangle nose
- Small stitched smile
- Light blush on cheeks
🧵 Final Assembly
Sew muzzle and ears to head.
Attach legs to body.
Dress body with jacket.
Insert and sew arms through sleeves.
Attach head to body.
Add buttons and facial embroidery.
Arrange basket, carrots, and cabbages beside Peter.
🌿 Finishing Touches & Display Tips
Sit Peter with legs forward and arms slightly curved inward.
Place vegetables in or near the basket for a garden scene.
Angle ears gently for personality.
This piece looks beautiful as a shelf decoration, nursery toy, or spring centerpiece.
Your Peter Rabbit is complete! 🐰🥕💙
This storybook-inspired amigurumi bunny is a timeless treasure filled with personality and charm—perfect for gifting or storytelling play! 🌿🐇🥕