Amigurumi Boy & Girl Siblings – FREE Crochet Pattern

Two crocheted dolls standing side by side; one is a boy wearing a striped shirt and blue shorts, and the other is a girl in a yellow dress with pink accessories, both look cheerful with backpacks.
Spread the love

Celebrate the bond of childhood with this Amigurumi Boy & Girl Siblings crochet pattern! Featuring a sweet pair of siblings with playful outfits, cheerful expressions, and plenty of personality, this adorable duo is perfect for storytelling, gifting, or adding a touch of family love to your amigurumi collection. Whether you’re crafting a tribute to your own little ones or creating characters for imaginative play, these dolls bring warmth and charm to every stitch. πŸ§ΆπŸ‘§πŸ‘¦πŸ’–

Designed for customization and creativity, this pattern invites you to mix soft yarns, expressive features, and fun extras like backpacks, toys, or matching accessories. Dress them in seasonal outfits, give them unique hairstyles, or add tiny props to reflect their favorite hobbies. Whether perched on a shelf, nestled in a gift basket, or starring in a handmade playset, these Boy & Girl Siblings Amigurumi are joyful and satisfying projectsβ€”perfect for stitching up a little handmade love, one loop at a time! βœ¨πŸŽ’πŸŒˆ

Two crocheted dolls standing side by side; one is a boy wearing a striped shirt and blue shorts, and the other is a girl in a yellow dress with pink accessories, both look cheerful with backpacks.
Copyright & Pattern Usage Policy

πŸ‘« Amigurumi Boy & Girl Siblings Crochet Pattern

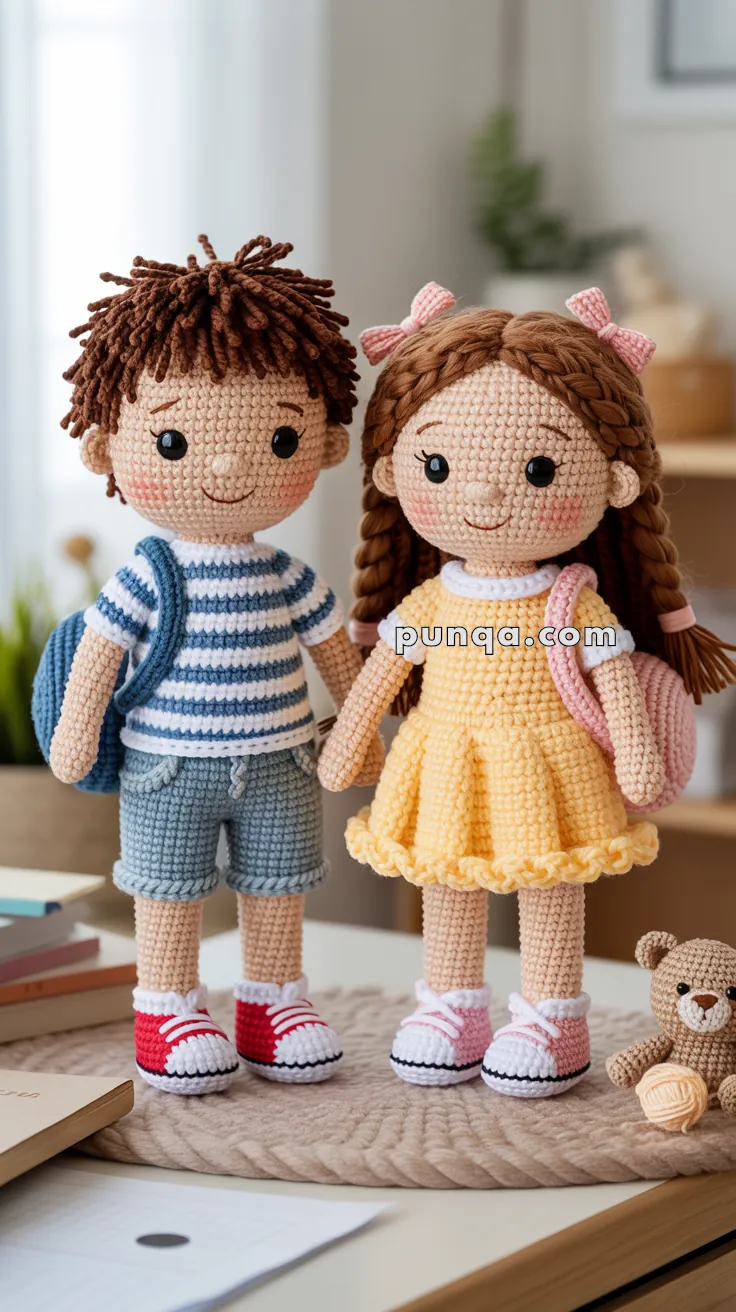
Bring a heartwarming handmade touch to your collection with this delightful pair of amigurumi siblings! The boy wears denim shorts with belt loops, a blue and white striped t-shirt, and a backpack, while the girl shines in a sunny yellow dress with twin braids and matching pink accessories. Their sweet expressions and coordinating outfits make them the perfect gift or display piece for nurseries, classrooms, or collectors.


✨ Skill Level

Intermediate – Involves basic shaping, color changes, surface detailing, and assembly.


πŸ“ Finished Size

Approx. 8–10 inches (20–25 cm) tall using DK weight yarn and a 2.5 mm crochet hook.


🧢 Materials

Yarn (DK weight cotton or acrylic):

  • Skin: Light beige or peach
  • Boy’s Hair: Chocolate brown
  • Girl’s Hair: Warm brown
  • Boy’s Shirt: White and blue
  • Boy’s Shorts: Light denim blue
  • Girl’s Dress: Yellow
  • Girl’s Dress/Bow Trim: Light pink
  • Shoes: Red, pink, white, black
  • Backpacks: Denim blue & blush pink
  • Belt loops: Gray or tan (optional)

Other Supplies:

  • Crochet hook: 2.5 mm
  • Safety eyes: 8 mm (or black yarn for embroidery)
  • Tapestry needle
  • Stitch markers
  • Polyfill stuffing
  • Blush or pink pastel for cheeks (optional)
  • Black embroidery thread for smile

🧡 Abbreviations (US Terms)

  • MR – Magic Ring
  • sc – Single Crochet
  • inc – Increase (2 sc in one stitch)
  • dec – Decrease (sc2tog)
  • ch – Chain
  • sl st – Slip Stitch
  • hdc – Half Double Crochet
  • dc – Double Crochet
  • BLO – Back Loop Only
  • FLO – Front Loop Only
  • FO – Fasten Off
  • st(s) – Stitch(es)

πŸ‘¦ Boy Doll Pattern

Head (Skin color)

  1. MR, 6 sc (6)
  2. inc x6 (12)
  3. (1 sc, inc) x6 (18)
  4. (2 sc, inc) x6 (24)
  5. (3 sc, inc) x6 (30)
  6. (4 sc, inc) x6 (36) 7-14. sc around (36) – 8 rounds
  7. (4 sc, dec) x6 (30)
  8. (3 sc, dec) x6 (24)

Insert safety eyes between rounds 11-12, about 7-8 stitches apart.

  1. (2 sc, dec) x6 (18)

Stuff head firmly.

  1. (1 sc, dec) x6 (12)
  2. dec x6 (6)

FO, leaving long tail. Weave through remaining stitches and pull tight to close.


Ears (Skin color, Make 2)

  1. MR, 6 sc (6)
  2. (1 sc, inc) x3 (9)
  3. sc around (9)

FO, leaving long tail for sewing.

Flatten ears slightly and sew to sides of head between rounds 10-13, about 3-4 stitches behind the eyes.


Body (Skin color)

  1. MR, 6 sc (6)
  2. inc x6 (12)
  3. (1 sc, inc) x6 (18)
  4. (2 sc, inc) x6 (24) 5-14. sc around (24) – 10 rounds

FO, leaving long tail for sewing to head. Stuff body firmly.

Sew head to body securely.


Legs (Make 2)

Shoe Part (Red)

  1. MR, 6 sc (6)
  2. inc x6 (12)
  3. (1 sc, inc) x6 (18)
  4. BLO: sc around (18)
  5. sc around (18)

Change to white.

  1. sc around (18)

Change to black.

  1. BLO: sc around (18)

Change to white.

  1. sc around (18)

Using white yarn, embroider 3-4 horizontal lines across the red shoe section to create lace details.

Leg Part (Skin color)

  1. Change to skin color: (1 sc, dec) x6 (12) 10-18. sc around (12) – 9 rounds

Stuff leg and shoe firmly. FO, leaving long tail for sewing.

Sew legs to bottom of body, positioning them slightly apart for stability.


Arms (Make 2)

Hand (Skin color)

  1. MR, 6 sc (6)
  2. (1 sc, inc) x3 (9) 3-8. sc around (9) – 6 rounds

Sleeve (Blue and white stripes)

  1. Change to blue: sc around (9)
  2. Change to white: sc around (9)
  3. Change to blue: sc around (9)
  4. Change to white: sc around (9)

Stuff hand lightly, leave arm unstuffed or lightly stuffed. FO, leaving long tail for sewing.

Sew arms to sides of body at rounds 3-5 from neck.


Hair (Dark brown)

Cut approximately 80-100 strands of yarn, each 4-5 inches long.

Loop attachment method:

  • Fold each strand in half
  • Insert hook through a stitch on head
  • Pull folded end through to create a loop
  • Pull yarn ends through the loop and tighten

Coverage:

  • Start from the center top (round 1) and work outward
  • Cover rounds 1-9 densely, creating a full head of hair
  • Place loops close together for a thick, textured look
  • Focus on top, sides, and back – leave face area clear

Trim hair to desired messy, tousled length (about 1-1.5 inches from head).


Striped Shirt

The shirt is embroidered directly onto the body using surface slip stitch or duplicate stitch:

Starting from neck (round 15 of body down to round 5):

  • Round 15-14: Blue
  • Round 13-12: White
  • Round 11-10: Blue
  • Round 9-8: White
  • Round 7-6: Blue
  • Round 5: White

Technique:

  • Use slip stitch on surface: Insert hook under both loops of a stitch, pull up a loop with colored yarn, insert hook in next stitch, pull through both loops
  • Continue around each round for even stripes
  • Weave in ends securely on the inside

Shorts (Denim blue)

Leg Pieces (Make 2)

  1. Ch 16, join with sl st to form ring, being careful not to twist (16) 2-6. sc around (16) – 5 rounds

FO first leg, leaving tail. Do NOT FO second leg.

Joining Legs

  1. Continue with second leg: sc 8, ch 2, sc 16 around first leg, sc 2 into chain space, sc 8 on second leg (36) 8-10. sc around (36) – 3 rounds

Waistband

  1. Ch 1, sc around (36)
  2. BLO: sc around (36) – creates fold line for waistband

FO, leaving long tail for sewing.


Belt Loops (Gray or tan, Make 4-5)

  • Ch 5
  • FO, leaving tails for sewing

Sew belt loops vertically onto waistband:

  • 1 at front center
  • 1 at back center
  • 1-2 on each side

Position shorts on doll and sew waistband to body at round 6-7.


Backpack (Denim blue)

Main Body

  1. Ch 8 (8)
  2. Starting in 2nd ch from hook: sc 6, 3 sc in last ch; working on opposite side of chain: sc 5, inc (16)
  3. inc, 5 sc, inc x3, 5 sc, inc x2 (22) 4-8. sc around (22) – 5 rounds
  4. (sc 9, dec) x2 (20)

FO, leaving tail.

Flap

  • Ch 8
  • Row 1: Starting in 2nd ch from hook, sc 7, turn (7)
  • Row 2-3: Ch 1, sc 7, turn (7)

FO, leaving tail. Sew flap to top back edge of backpack.

Straps (Make 2)

  • Ch 20-22 (adjust for desired length)
  • Row 1: Starting in 2nd ch from hook, sl st in each ch
  • FO

Sew one end of each strap to top corners of backpack, and other ends to bottom corners, creating adjustable shoulder straps.

Optional: Add a small button or embroidered detail to flap.

Position backpack on boy’s back and tack in place, or leave removable.


πŸ‘§ Girl Doll Pattern

Head (Skin color)

Follow same pattern as boy’s head (rounds 1-19).


Ears (Skin color, Make 2)

Follow same pattern as boy’s ears.

Sew to sides of head between rounds 10-13.


Body (Skin color)

Follow same pattern as boy’s body (rounds 1-14).

Sew head to body securely.


Legs (Make 2)

Shoe Part (Pink)

  1. MR, 6 sc (6)
  2. inc x6 (12)
  3. (1 sc, inc) x6 (18)
  4. BLO: sc around (18)
  5. sc around (18)

Change to white.

  1. sc around (18)

Change to black.

  1. BLO: sc around (18)

Change to white.

  1. sc around (18)

Using white yarn, embroider 3-4 horizontal lines across the pink shoe section for lace details.

Leg Part (Skin color)

  1. Change to skin color: (1 sc, dec) x6 (12) 10-18. sc around (12) – 9 rounds

Stuff leg and shoe firmly. FO, leaving long tail for sewing.

Sew legs to bottom of body.


Arms (Make 2)

Hand (Skin color)

  1. MR, 6 sc (6)
  2. (1 sc, inc) x3 (9) 3-8. sc around (9) – 6 rounds

Sleeve (Pink)

  1. Change to pink: sc around (9) 10-11. sc around (9) – 2 rounds

Stuff hand lightly. FO, leaving long tail for sewing.

Sew arms to sides of body at rounds 3-5 from neck.


Hair (Warm brown)

Base Coverage

Cut approximately 100-120 strands of yarn, each 18-20 inches long (for braids).

Create center part:

  • Mark a line from front to back, dividing head in half

Attach hair strands:

  • Use same loop method as boy
  • Attach strands along and on either side of the center part
  • Cover rounds 1-9 on both sides of head
  • Leave strands long and uncut for braiding
  • Create dense coverage – strands should be close together

Braiding

Left side:

  • Gather all strands on left side near ear level
  • Divide into 3 equal sections
  • Braid tightly to desired length (3-4 inches from head)
  • Secure end with small piece of matching yarn tied in knot

Right side:

  • Repeat same braiding process
  • Ensure both braids are equal length

Trim braid ends evenly if needed.


Dress

Bodice (Yellow)

Ch 26, join with sl st to first ch to form ring, being careful not to twist (26)

  1. Ch 1, sc in each ch around (26) 2-3. sc around (26) – 2 rounds

Switch to pink for trim:

  1. sc around (26)

Switch back to yellow:

5-6. sc around (26) – 2 rounds

Skirt

  1. Ch 2 (counts as first dc), (4 sc, inc) x5, join with sl st to top of ch-2 (31)
  2. Ch 2, dc in each st around, join (31)
  3. Ch 2, (4 dc, inc) x6, dc to end, join (37)
  4. Ch 2, dc around, join (37)
  5. Ch 2, (5 dc, inc) x6, dc to end, join (43)
  6. Ch 2, dc around, join (43)
  7. Ch 2, (6 dc, inc) x6, dc to end, join (49)

Ruffle Edge (Pink)

  1. Join pink in any st: [(sl st, ch 2, 2 dc, ch 2, sl st) all in same stitch – shell made], skip next 2 sts; repeat from * around

FO and weave in all ends securely.

Slip dress over doll’s head and position at waist (around rounds 6-8 of body). Sew bodice to body using matching yellow yarn.


Hair Bows (Pink, Make 2)

  1. Ch 10
  2. Row 1: Starting in 2nd ch from hook, sc 9, turn (9)
  3. Row 2: Ch 1, sc 9, turn (9)
  4. Row 3: Ch 1, sc 9 (9)

FO, leaving long tail.

Creating bow shape:

  • Pinch rectangle in center
  • Wrap yarn tightly around middle 3-4 times
  • Secure and tie off
  • Use tails to sew to end of each braid

Backpack (Blush pink)

Follow exact same pattern as boy’s backpack using pink yarn instead of blue.

Position backpack on girl’s back and tack in place, or leave removable.


βœ‚οΈ Finishing Touches

Face Details

Eyes:

  • Insert safety eyes between rounds 11-12 of head
  • Space approximately 7-8 stitches apart (measure to ensure symmetry)
  • Secure backs tightly before final stuffing

Smile:

  • Using black embroidery thread or yarn, embroider a small curved smile
  • Position centered below eyes, approximately at round 14-15
  • Use backstitch: bring needle up at one end, down at center, up at center, down at other end
  • Smile should be about 3-4 stitches wide

Nose (optional):

  • Using pink yarn, make 1-2 tiny vertical stitches between and slightly below eyes
  • Keep it subtle

Cheeks:

  • Apply pink blush, chalk pastel, or pink colored pencil to cheek areas
  • Use circular motions and blend gently
  • Build up color gradually

Eyebrows (optional):

  • Using brown yarn, make 2-3 tiny stitches above each eye for subtle eyebrows

Assembly Order

  1. Prepare head: Insert eyes, embroider face, stuff firmly
  2. Attach ears: Sew ears to sides of head at correct position
  3. Complete body: Stuff body firmly
  4. Join head to body: Use mattress stitch or whip stitch, ensuring secure attachment
  5. Attach legs: Sew to bottom of body with even spacing
  6. Attach arms: Sew to sides at shoulder area
  7. Add hair:
    • Boy: Attach looped hair and trim
    • Girl: Attach long strands, create braids, add bows
  8. Dress dolls:
    • Boy: Embroider stripes on body, put on shorts, add belt loops
    • Girl: Slip on dress and sew to waist
  9. Add backpacks: Position and attach as desired
  10. Final touches: Apply blush, check all attachments, trim any loose yarn ends

Stability Tips

  • Ensure legs are stuffed very firmly for standing support
  • Position legs slightly wider apart for better balance
  • If dolls won’t stand independently, they can lean against objects or sit
  • Consider adding small weights (like poly pellets) to feet before closing if standing is desired

Final Quality Checks

  • Symmetry: Check that eyes, ears, arms, and legs are evenly placed
  • Stuffing: Ensure firm, even stuffing with no lumps
  • Security: Tug gently on all attached parts to ensure they’re secure
  • Yarn ends: All ends should be woven in securely and trimmed close
  • Face: Expression should be sweet and symmetrical
  • Clothing: Garments should fit well and be securely attached
  • Hair: Hair should be full and evenly distributed

πŸ’‘ Customization Ideas

  • Skin tones: Use various shades of beige, tan, brown for diverse representation
  • Hair colors: Try blonde, red, black, or fantasy colors
  • Eye colors: Use different colored safety eyes (blue, brown, green, hazel)
  • Seasonal outfits: Create winter coats, summer swimwear, holiday costumes
  • Accessories: Add tiny glasses, hats, shoes, jewelry, or stuffed pets
  • Personalization: Embroider names on clothing or backpacks
  • Additional clothing: Make removable outfits like pajamas, sports uniforms, or formal wear
  • Sibling variations: Create older/younger siblings by adjusting size
  • Themed sets: School day, beach trip, camping, birthday party, holidays

πŸ“ Notes

  • Gauge: Maintain consistent tension throughout for even shaping
  • Color changes: When changing colors, work last yarn over of previous row with new color for clean transition
  • Sewing: Use matching yarn colors when attaching pieces for invisible seams
  • Stuffing: Use small amounts at a time and distribute evenly with stuffing tool or chopstick
  • Safety: If making for young children, embroider eyes instead of using safety eyes
  • Washing: Hand wash gently in cool water if needed, reshape and air dry flat

These charming amigurumi siblings are a perfect showcase of handmade love, full of detail and personality for any occasion! πŸ§ΆπŸ’•


Spread the love

1 Comment

  1. Ψ³ΨΉΨ§Ψ― Ω…Ψ­Ω…ΩˆΨ―

    Wonderful

Leave a Reply

Your email address will not be published. Required fields are marked *