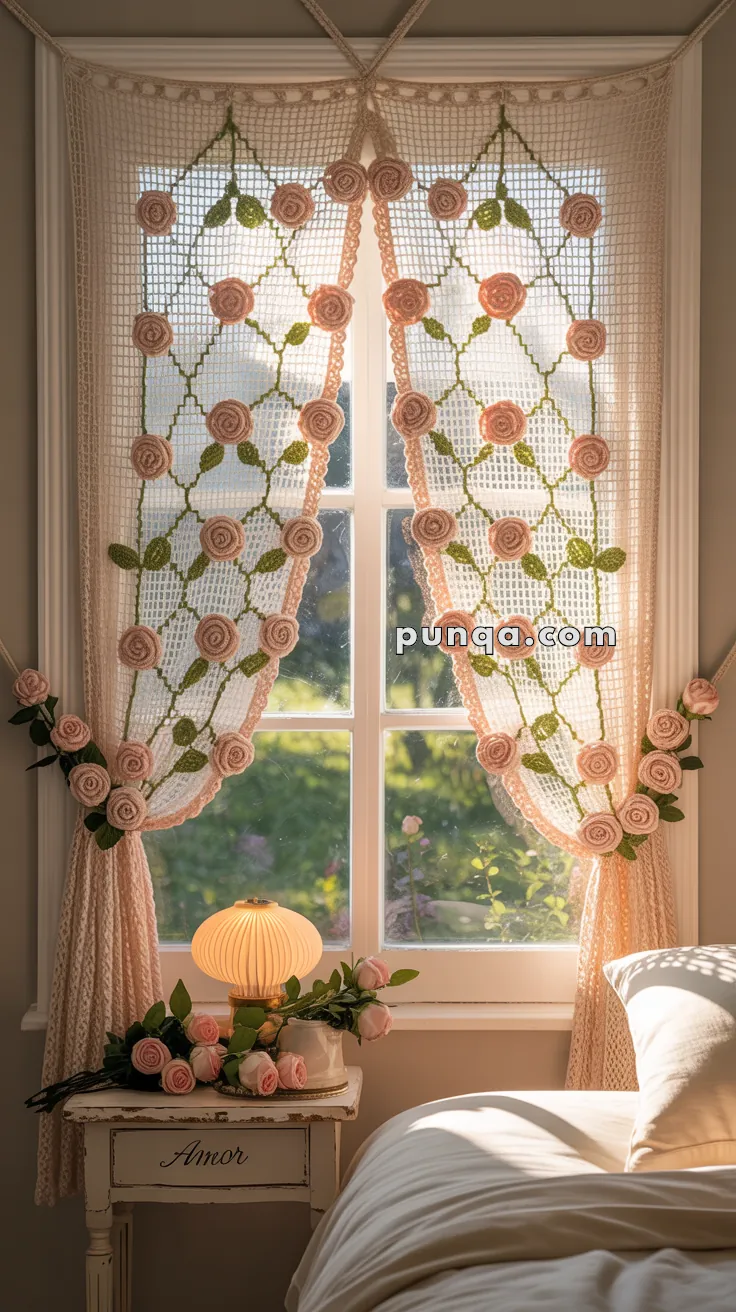
Let your windows bloom with timeless elegance using this Crochet Rose Garden Curtain pattern! Featuring a delicate lace backdrop adorned with graceful rose motifs, this design brings the romance of a blooming garden right into your home. Whether you’re dressing up a cozy kitchen, adding vintage charm to a bedroom, or simply love floral crochet, this curtain is a beautiful way to showcase your skills and add a touch of handmade artistry to your space. 🌹🪟✨
Designed for creativity, this pattern invites you to play with soft pastels, classic whites, or even bold hues to make each rose pop. Add tiny embellishments like beads for dewdrops or a scalloped edge for extra flair. Whether you craft a full-length panel or a breezy valance, this Crochet Rose Garden Curtain is a joyful and satisfying project—perfect for bringing a touch of handmade garden magic to every stitch! 🧶💖🌼
🌹 Crochet Rose Garden Curtain Pattern
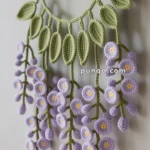
Bring a soft, romantic glow to your space with this elegant crochet curtain featuring delicate spiral roses climbing along slender leafy vines. Designed with a fine filet mesh base and graceful scalloped edges, this curtain filters light beautifully while adding a timeless cottage-inspired charm.
The airy construction allows the curtain to drape gently, making it ideal for bedrooms, reading nooks, or vintage-styled interiors.
✨ Skill Level
Intermediate
(Filet crochet mesh, surface vine work, motif placement, decorative edging)
📏 Finished Size
Each panel (blocked):
- Width: approx. 18 in / 46 cm
- Height: approx. 36 in / 91 cm
Size can be adjusted by adding or removing mesh repeats vertically or horizontally.
🧶 Materials
Yarn (smooth cotton recommended):
- Cream / Off-White: 300–400 g
(mesh base + top edge) - Blush Pink: 100 g
(roses, scalloped edging, ties) - Olive or Sage Green: 50 g
(vines and leaves)
Tools:
- 2.5–3.0 mm crochet hook
- Tapestry needle
- Blocking mat and pins
- Scissors
🧵 Abbreviations (US Terms)
- ch – Chain
- sc – Single Crochet
- dc – Double Crochet
- sl st – Slip Stitch
- sp – Space
- st(s) – Stitch(es)
- FO – Fasten Off
🪟 FILET MESH PANEL
(Make 2 identical panels)
The base is a fine, evenly spaced filet mesh, creating small square openings.
Foundation
With cream yarn:
Ch 98 (multiple of 4 + 2)
Mesh Pattern
Row 1:
Dc in 6th ch from hook, ch 2, skip 2 ch, dc in next ch repeat across. Turn.
Row 2:
Ch 5, dc in next dc, ch 2, dc in next dc repeat across. Turn.
Repeat Row 2 until panel measures approx. 34 in / 86 cm tall.
FO.
Lightly block so mesh opens evenly into square cells.
🌿 VINE PATHS
(worked directly onto the mesh)
The green vines are slim chained lines that travel diagonally across the mesh.
Attach green yarn at a mesh intersection.
- Ch 6, sl st into the next diagonal mesh intersection
Repeat to form a continuous diamond lattice running vertically up the panel.
FO after completing all vine paths.
🍃 LEAVES
(worked onto vine chains)
Attach green yarn to a vine chain space.
- Ch 7
- Sc in 2nd ch, hdc, dc, dc, hdc, sc
- Sl st into vine
Leaves should appear slightly raised and angled, usually placed in pairs between roses.
FO after each leaf.
🌸 SPIRAL ROSES
(Make 24–30 per panel)
The roses are compact spirals, gently domed, not layered petals.
Rose Strip
With blush pink yarn:
Ch 26
Row 1:
Sc in 2nd ch from hook and across. (25)
Row 2:
2 dc in each st across — the strip will curl naturally.
FO.
Roll tightly from one end into a spiral.
Secure with stitches through the base.
Leave a long tail for sewing.
🧵 ROSE PLACEMENT
- Roses sit at vine intersections
- Spacing is even and symmetrical
- Each rose is sewn through multiple mesh strands for stability
Position first, then stitch permanently.
🌸 SCALLOPED EDGE
(sides and bottom only)
With blush pink yarn, work around both side edges and the bottom.
Attach yarn to a corner.
- (5 dc in same sp, skip next sp, sl st in next sp) repeat evenly
This creates the soft rounded scallops visible in the photo.
FO and weave in ends.
🎀 TOP TIES (CROSSED STYLE)
Each panel has two long ties.
With blush pink yarn:
- Ch 120
- Sc in 2nd ch from hook and across
- FO
Attach ties to the top inner corners of each panel.
Cross above the window and knot loosely.
🌷 SIDE ROSE TIEBACK ACCENTS
Make 3–5 extra roses per side.
Sew vertically along the lower side edges where the curtain gathers.
These act as decorative anchors when the panel is pulled back.
✅ Finishing
- Block gently to final dimensions
- Ensure mesh remains square and open
- Adjust tie length if needed
Hang panels slightly parted to allow light through the center.
🌹 Final Note
This curtain is designed to feel light, romantic, and handcrafted — with just enough texture to draw the eye without blocking daylight. The fine mesh, winding vines, and sculpted roses work together to create a soft garden-inspired statement that transforms any window into a focal point.
Enjoy the slow rhythm of the mesh, take your time placing each rose, and let the design grow stitch by stitch 🌸🧶