Brighten up your crochet collection with this Amigurumi Ladybug on a Daisy pattern! Inspired by the beauty of nature, this charming design captures the delicate petals of a daisy and the adorable spotted ladybug resting on top. With its vibrant colors and playful details, this crochet creation is perfect for adding a cheerful touch to your handmade projects. Whether you’re crafting for garden lovers, decorating a cozy space, or simply enjoy making nature-inspired amigurumi designs, this pattern lets you stitch up a delightful floral scene bursting with charm! 🌼🐞✨
Designed for customization, this pattern allows you to experiment with different shades of yellow, white, and red, embroidered details, or even tiny accessories like a miniature leaf or extra ladybugs for added whimsy. Craft a classic daisy with its signature bright hues, create a pastel version for a dreamy aesthetic, or even stitch up a full set of flower-inspired amigurumi for a stunning display! Whether gifted as a cherished keepsake, displayed as a joyful accent, or made simply for the love of crafting, this Amigurumi Ladybug on a Daisy is a fun and creative project—perfect for bringing a touch of handmade nature magic to every stitch! 🧶💖
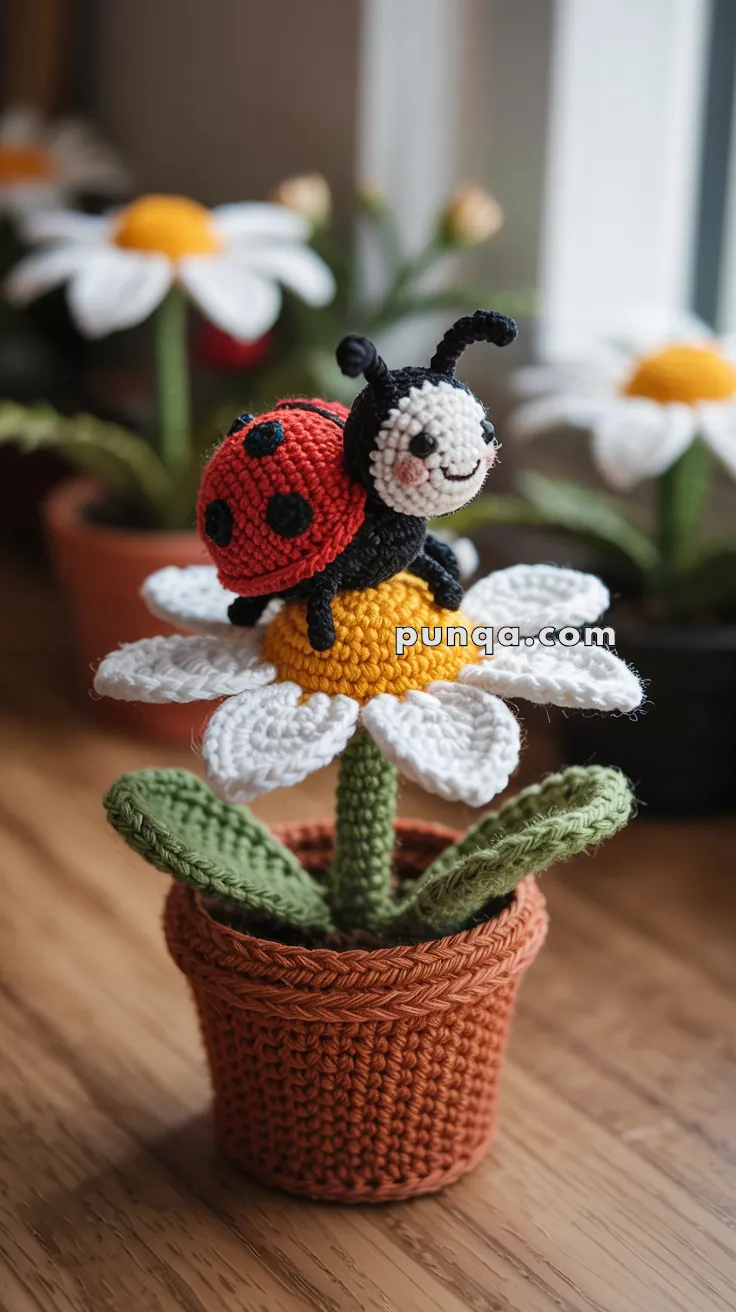
🐞🌼 Amigurumi Ladybug on Daisy in a Pot
A charming spring crochet design featuring a removable ladybug perched on a daisy blooming from a terracotta pot. The final result is whimsical, sturdy, and beautifully dimensional—perfect for windowsill décor, gifts, nursery accents, or desk cheer.
This photo-accurate pattern is based on the reference you provided, capturing every detail: the warm golden-orange flower center, long slender petals, slim green stem, terracotta pot texture, lightly curved leaves, and the adorable mini ladybug with perfect proportions. Best of all, the ladybug remains removable—no sewing required—so it can be posed, held, or displayed separately.
✨ Skill Level
Intermediate – involves color changes, shaping, simple structural support, and neat finishing.
📏 Finished Size
Approx. 7–8 in (18–20 cm) tall with DK yarn and 2.75–3.0 mm hook.
🧶 Materials
Yarn (DK / Light Worsted):
- Red — 10 g (ladybug shell)
- Black — 15 g (ladybug head, body, legs, antennae, spots)
- White — 10 g (ladybug face & daisy petals)
- Soft pink — small amount (cheeks)
- Golden-orange — 10 g (daisy center)
- Green — 15 g (stem & leaves)
- Terracotta (warm brown-orange) — 20 g (pot)
Supplies
- 2.75–3.0 mm crochet hook
- Fiberfill stuffing
- 6 mm safety eyes or black thread
- Floral wire or pipe cleaner (for stem and leaf support)
- Tapestry needle
- Stitch marker
🔤 Abbreviations (US Terms)
MR – magic ring
sc – single crochet
inc – increase (2 sc in same stitch)
dec – invisible decrease (sc2tog)
sl st – slip stitch
ch – chain
hdc – half double crochet
dc – double crochet
FO – fasten off
Work in continuous rounds unless stated.
🐞 Ladybug
The ladybug is fully removable and sits snugly on the daisy center. Its proportions match the photo: a round head with visible black “hood,” slight pink cheek blush, short antennae, small spots, and compact legs.
👤 Head
Color order: Black head with white facial dome
Start with black.
Head Base (Black):
R1: MR, 6 sc (6)
R2: inc ×6 (12)
R3: (sc, inc) ×6 (18)
R4–8: sc around (18)
Switch to white (face):
R9: (2 sc, inc) ×6 (24)
R10–11: sc around (24)
Place safety eyes between R9–10, spaced 6 sts apart.
Lightly stuff.
Shape face closure:
R12: (2 sc, dec) ×6 (18)
R13: (sc, dec) ×6 (12)
R14: dec ×6 (6)
FO, close and fully stuff the head.
Face Embroidery:
- Soft, curved smile
- Tiny pink round blush low on cheeks
- Light eyebrows using brown/black
- If no safety eyes, embroider small filled pupils
📍 White section should cover ~75% of the front round head with a visible black border, exactly as in the reference.
🐞 Integrated Body & Shell
Red shell blends directly from black body, not a separate cover.
R1: With black, MR, 6 sc (6)
R2: inc ×6 (12)
R3–4: sc around (12)
Switch to red:
R5: (3 sc, inc) ×3 (15)
R6–9: sc around (15)
R10: (3 sc, dec) ×3 (12)
Stuff lightly
R11: (sc, dec) ×4 (8)
R12: dec ×4 (4)
FO, close.
📍 This creates a plump red dome over the black body exactly like the photo.
⚫ Spots (Make 6)
With black:
R1: MR, 6 sc (6)
R2: inc ×6 (12)
sl st, FO.
Sew 3 spots per side, spaced like the photo.
🦵 Legs (Make 6, Short & Stubby)
With black:
R1: MR, 5 sc (5)
R2–3: sc around (5)
Stuff very lightly
FO.
Sew 3 per side, positioned low on body with slight outward angle.
🛰 Antennae (Make 2 — Short)
With black:
ch 5, sl st back to base.
FO.
Curve slightly upward.
🌼 Daisy Flower
🟠 Center (Warm Golden-Orange)
R1: MR, 6 sc (6)
R2: inc ×6 (12)
R3: (sc, inc) ×6 (18)
R4: (2 sc, inc) ×6 (24)
R5–6: sc around (24)
R7: (2 sc, dec) ×6 (18)
R8: (sc, dec) ×6 (12)
Stuff moderately to form a raised puff.
R9: dec ×6 (6)
FO and close.
📍 Dome shape should be softly rounded—not spherical—and large enough for ladybug to sit securely on top.
🌼 Petals (Make 8 – Long & Slim)
Work in rounds for slight natural curve.
With white:
R1: MR, 6 sc (6)
R2: (sc, inc) ×3 (9)
R3–7: sc around (9)
R8: (sc, dec) ×3 (6)
R9: dec ×3 (3)
FO.
Sew evenly around center, slightly overlapping.
Petals should angle gently downward, not stand upright.
🌿 Stem
Slim relative to flower.
With green:
R1: MR, 6 sc (6)
R2–25: sc around (6)
Insert floral wire inside; stuff very lightly.
FO leaving long tail.
Attach at bottom center of daisy head.
🍃 Leaves (Make 2)
Flat, slightly curved single-layer leaves:
With green:
ch 13
Row 1: sc in 2nd ch, sc, hdc, dc, dc, dc, dc, hdc, sc, sc, sc (11)
Row 2: ch 1, turn, sc across (11)
Row 3: ch 1, turn, sc across (11)
FO.
Insert wire between Rows 1–3 and stitch into place OR crochet over wire when working Row 3.
Slightly arc each leaf outward.
Sew both at stem base.
🪴 Terracotta Pot
Straight walls with a simple rim ridge.
R1: MR, 6 sc (6)
R2: inc ×6 (12)
R3: (sc, inc) ×6 (18)
R4: (2 sc, inc) ×6 (24)
R5: (3 sc, inc) ×6 (30)
R6: (4 sc, inc) ×6 (36)
R7: BLO sc around (36)
R8–11: sc around (36)
R12: (5 sc, inc) ×6 (42)
R13: BLO sc around (42) — rim ridge
R14–15: sc around (42)
FO.
Add fiberfill or weight to base if needed for stability.
🟢 Soil Insert (Green Base Circle)
Fits perfectly against pot opening.
R1: MR, 6 sc
R2: inc ×6 (12)
R3: (sc, inc) ×6 (18)
R4: (2 sc, inc) ×6 (24)
R5: (3 sc, inc) ×6 (30)
R6: (4 sc, inc) ×6 (36)
FO.
Sew disc to secure stem inside center before attaching leaves.
🪡 Assembly
1. Join Stem & Flower
Center the stem under the daisy head.
Stitch firmly.
2. Attach Leaves
Sew leaves to sides of stem bottom, angled outward.
3. Fix Stem to Green Base Disc
Sew securely.
4. Insert & Stitch Base Disc into Pot
The disc should sit neatly inside the pot rim with no gaps.
5. Final Flower Shaping
Bend petals gently downward.
Adjust leaf curves.
6. Position Ladybug
Place ladybug onto center dome.
She should sit securely without stitching.
🌟 Display Tips
- Curve petals for a natural bloom look
- Tilt ladybug slightly sideways for a cute expression
- Use soft pastels for cheek tint
- Place near a window for the happiest effect
❤️ Final Thoughts
Your ladybug and daisy are complete—a tiny spring garden captured in yarn. The rounded golden center, slim petals, terracotta pot, and cheerful removable ladybug create a joyful handmade scene that never wilts. Whether decorating your desk, gifting to a friend, or adding charm to a child’s room, this sweet crochet piece brings pure sunshine.
Happy stitching, and may every glance at your little ladybug bring a smile! 🌿🐞🌼