Cruise into creativity with this Amigurumi Hippie Van crochet pattern! Whether you’re crafting for vintage lovers, adding a retro touch to your handmade collection, or simply enjoy making unique amigurumi designs, this free pattern lets you stitch up a classic hippie van bursting with personality. With its iconic shape, colorful details, and nostalgic charm, this crochet van captures the spirit of adventure and freedom in every stitch. Perfect for gifting to fellow crochet enthusiasts, decorating a boho-inspired space, or simply celebrating the joy of handmade creations, this amigurumi hippie van is ready to bring a touch of wanderlust to your collection! 🚐✨
Designed for customization, this pattern allows you to experiment with different color schemes, embroidered details, or even tiny accessories like peace signs or miniature luggage for extra personality. Craft a classic flower-power van with vibrant hues, create a pastel version for a dreamy aesthetic, or even stitch up a full road-trip-inspired set with matching vehicles! Whether gifted as a whimsical keepsake, displayed as a quirky accent, or made simply for the joy of crafting, this Amigurumi Hippie Van is a fun and creative project—perfect for bringing the free-spirited vibes of the open road to every stitch! 🧶🌼
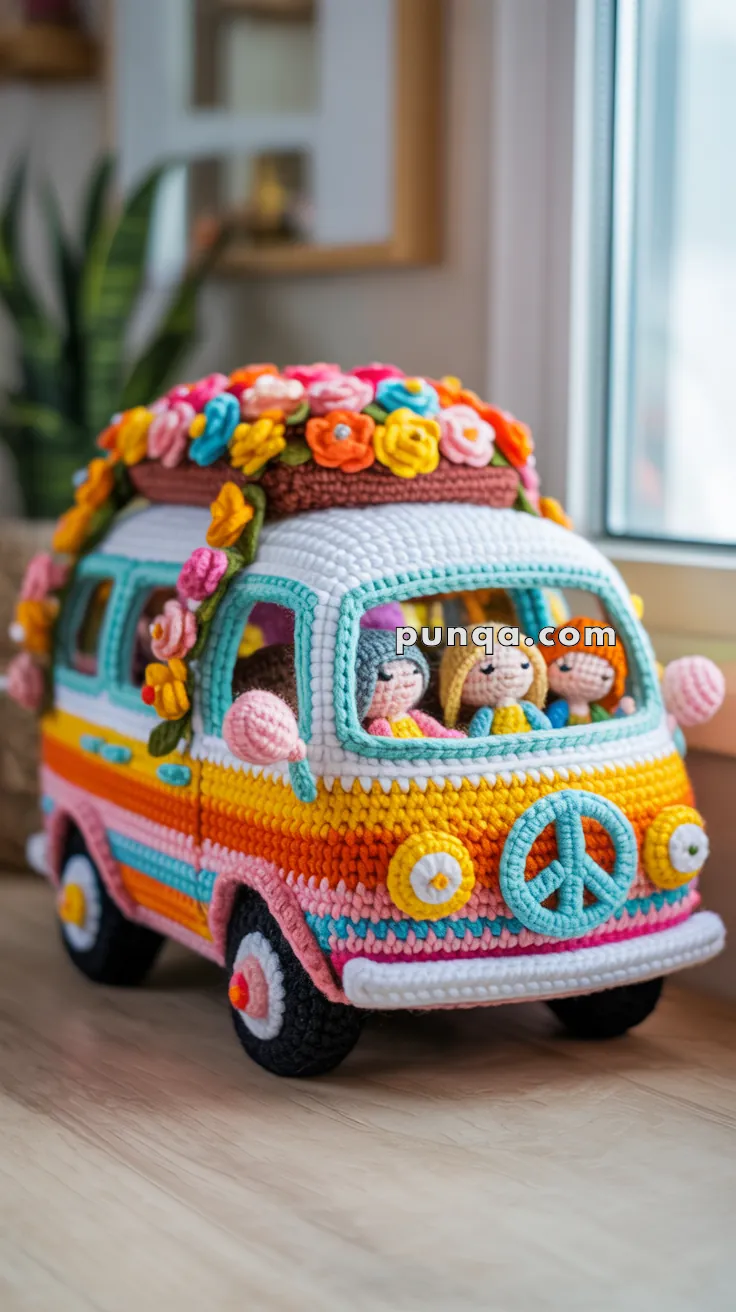
🚐 Amigurumi Hippie Van Crochet Pattern
Capture the spirit of the ’60s with this joyful, flower-powered crochet van! Complete with groovy colors, peace symbols, and happy passengers, it’s perfect for nostalgic decor or imaginative play.
✨ Skill Level
Intermediate to Advanced — shaping, color changes, structural reinforcement, dense assembly, and motifs.
📏 Finished Size
Approx. 30–33 cm (12–13 in) long
Approx. 23–25 cm (9–10 in) tall
Approx. 17–18 cm (6.5–7 in) wide
(using DK cotton & 2.75–3 mm hook)
🧶 Materials
- DK or light worsted cotton yarn
- White – roof, window band, bumpers
- Aqua / teal – window frames, peace sign, trim
- Yellow – upper stripe, front nose
- Orange – mid stripe
- Light pink – lower stripe
- Rose-pink – fenders & small accents
- Black – wheels
- Grey – wheel inserts & reinforcement
- Brown – roof box
- Soft green – vines
- Flower colors – hot pink, turquoise, yellow, orange, rose, red, coral, magenta
- Passenger skin, hair, hat, shirt colors
- Tools & Supplies
- 2.75–3.0 mm hook
- Stuffing
- Plastic canvas or strong cardboard
- Yarn needle
- 8–10 mm safety eyes for passengers
- Optional thin wire for shaping long flower vines
🧵 Abbreviations
MR – magic ring
sc – single crochet
inc – increase
dec – invisible decrease
sl st – slip stitch
ch – chain
FLO – front loop only
BLO – back loop only
FO – fasten off
🚌 Van Body – Curved VW Shape
The van body must be rounded, not tubular. We will widen at the base and slightly narrow before the windows.
Base Foundation (light pink)
R1 ch 42, sc in 2nd ch from hook, sc 39, 3 sc in last; rotate; sc 39, 2 sc in last (84)
R2 inc, sc 39, inc ×2, sc 39, inc (88)
R3 (1 sc, inc), sc 39, (1 sc, inc, 1 sc), sc 39, (inc, 1 sc) (92)
Lower Pink Band (thick)
R4–8 sc around (92)
Aqua Stripe (thin)
R9 join aqua, sc around (92)
Middle Pink Stripe (thin)
R10 join light pink, sc around (92)
Orange Band (tall)
R11–15 join orange, sc around (92)
Yellow Band (tallest)
R16–22 join yellow, sc around (92)
White Window Band Preparation
R23–24 join white, sc around (92)
Slight Narrowing Before Windows (to match van curve)
R25 (21 sc, dec) ×4 (88)
R26 sc around (88)
🪟 Window Openings – Correct Shapes
Window Layout (per long side):
- 1 large rectangular window (front passenger group)
- 1 medium square window
- 1 small narrow rear window
Window Hole Placement (white)
R27:
sc 6, ch 14, sk 14 (LARGE window)
sc 4, ch 10, sk 10 (MEDIUM window)
sc 4, ch 8, sk 8 (SMALL window)
sc to end of long side
Short back side: sc around (no windows).
Opposite long side: repeat same window pattern.
Front short side (windshield opening):
sc 4, ch 26, sk 26, sc to end
R28: sc into each sc & each ch across (88 total)
🪟 Thick Aqua Window Frames
For every window opening, including windshield:
Round 1 — join aqua, FLO sc evenly around
Round 2 — sc around
Round 3 — FLO sc around for extra-thick ridge
This creates the bold 3D window borders.
🧱 Van Taper & Roof Connection
R29 (white) — sc around
R30 (20 sc, dec) ×4 (84)
R31–33 sc around (84)
Stop here — roof panel will attach on top.
🌨 Roof Panel (white, domed)
R1 MR 6
R2 inc ×6 (12)
R3 (1 sc, inc) ×6 (18)
R4 (2 sc, inc) ×6 (24)
R5 (3 sc, inc) ×6 (30)
R6 (4 sc, inc) ×6 (36)
R7 (5 sc, inc) ×6 (42)
R8 (6 sc, inc) ×6 (48)
R9 (7 sc, inc) ×6 (54)
R10–12 sc around (54)
Stuff lightly underneath for a smooth dome.
Pin and sew onto the top opening.
🧺 Rooftop Box (brown, tall & rectangular)
Base
R1 ch 18, sc 17 (17)
R2–6 sc across (17) — base rectangle
Walls
Work around edge of base:
R7 BLO sc 17 (long), sc 6 (short), sc 17, sc 6 (46)
R8–14 sc around (46)
The walls should be tall and straight.
Leave top open.
Sew centered onto roof.
🛞 Wheels (black with large yellow centers)
Make 4.
Wheel
R1 MR 6
R2 inc ×6 (12)
R3 (1 sc, inc) ×6 (18)
R4 (2 sc, inc) ×6 (24)
R5 BLO sc (24)
R6–7 sc (24)
Insert plastic circle + some stuffing.
R8 (2 sc, dec) ×6 (18)
FO.
Hubcap (white + large yellow center)
White ring:
R1 MR 6
R2 inc ×6 (12)
R3 (1 sc, inc) ×6 (18)
Large yellow center:
R1 MR 6
R2 inc ×6 (12)
R3 sc around (12)
Sew yellow center over most of the white (70% coverage).
Attach hubcap to wheel front.
Sew wheels to body aligned with fenders.
🎀 Pink Fenders (rose-pink)
Make 4.
R1 ch 18, sc 17
R2–5 sc across
FO.
Curve into a semi-oval and sew tightly above wheels.
These must be darker rose-pink, not the light pink stripe color.
🧱 Front Nose Panel (correct colors & order)
From top → bottom the colors are:
Yellow → Orange → Pink → Aqua trim
R1 ch 20, sc 19 (yellow)
R2–3 sc (yellow)
R4–5 join orange, sc rows
R6–7 join light pink, sc rows
R8 join aqua, sc row (thin trim)
FO.
Sew under windshield opening, centered.
☮️ Large Peace Emblem
Yellow base disc
R1 MR 6
R2 inc ×6 (12)
R3 (1 sc, inc) ×6 (18)
R4 (2 sc, inc) ×6 (24)
R5 (3 sc, inc) ×6 (30)
Aqua peace sign
Ring:
R1 MR 6 → R2 inc ×6 (12) → R3 (1 sc, inc) ×6 (18)
Vertical line: ch 14 → sc back (13)
Diagonal lines ×2: ch 10 → sc back (9)
Assemble all pieces into peace symbol.
Sew to yellow base, then attach to van nose.
🔆 Headlights (white with yellow center)
Outer white:
R1 MR 6 → R2 inc ×6 (12)
Large yellow center:
R1 MR 6 → R2 inc ×6 (12)
Sew yellow over most of white.
Attach to front sides.
🪞 Mirrors (rose-pink circles on aqua stalks)
Circle:
R1 MR 6
R2 inc ×6 (12)
Stalk:
ch 6, sl st back
Attach at front corners.
🌸 Flower System – Roses, Daisies, Buds
You MUST include at least 4 flower types to match the photo.
Rolled Roses (most important)
ch 40
Row 1: (sc, hdc, dc) in each stitch
Roll tightly into a rose, sew base.
Daisy
MR, (sl st, ch 2, 2 dc, ch 2, sl st) ×5
Tight Bud
ch 5
Row 1: 4 sc
Roll and stitch.
Loopy Bloom
MR, ch 6, sl st ×12
FO.
Leaves
ch 7
sc, hdc, dc, dc, hdc, sc
Vines
ch 100–130
sl st back loosely
Add leaves every 10–12 sts (optional).
🌺 Flower Mounting (dense & cascading)
- Fill roof box FULL with roses + daisies (at least 15–20).
- Drape one long vine from roof box front, over the top, and down both sides.
- Attach flowers along the vine heavily.
- Add a second vine on opposite side, lower placement.
- Add roses directly on van sides near windows.
- Add scattered flowers on back side.
👩🎤 Passengers (3 dolls, hooded hats)
Head (skin)
R1 MR 6
R2 inc ×6 (12)
R3 (1 sc, inc) ×6 (18)
R4–5 sc (18)
Insert 8–10 mm eyes
R6 (1 sc, dec) ×6 (12)
R7 dec ×6 (6)
FO.
Body (very short)
R1 MR 6
R2 (1 sc, inc) ×3 (9)
R3–4 sc (9)
FO.
Hooded Hat
R1 MR 6
R2 inc ×6 (12)
R3 (1 sc, inc) ×6 (18)
R4 sc (18)
R5 sc 12, ch 1 turn → sc 12 (hood opening)
FO. Sew slightly pointed back.
Arms
ch 5 → sl st back
Make 2 per doll.
Place dolls side-by-side in windshield opening.
Sew arms to window sill as if leaning forward.
🧷 Final Assembly
- Adjust shape by steam-blocking lightly if needed.
- Insert reinforced base panel inside van body.
- Stuff body firmly but evenly.
- Attach wheels & fenders.
- Sew nose panel, headlights, mirrors, and peace emblem.
- Attach roof panel.
- Sew roof box on top.
- Attach window frames & trims.
- Install passengers.
- Add flower vines and dense flowers on box & sides.
🌈 You’re Done!
You’ve crocheted the happiest van on the road! Perfect for kids, decor, or gifting to your favorite free spirit 💛