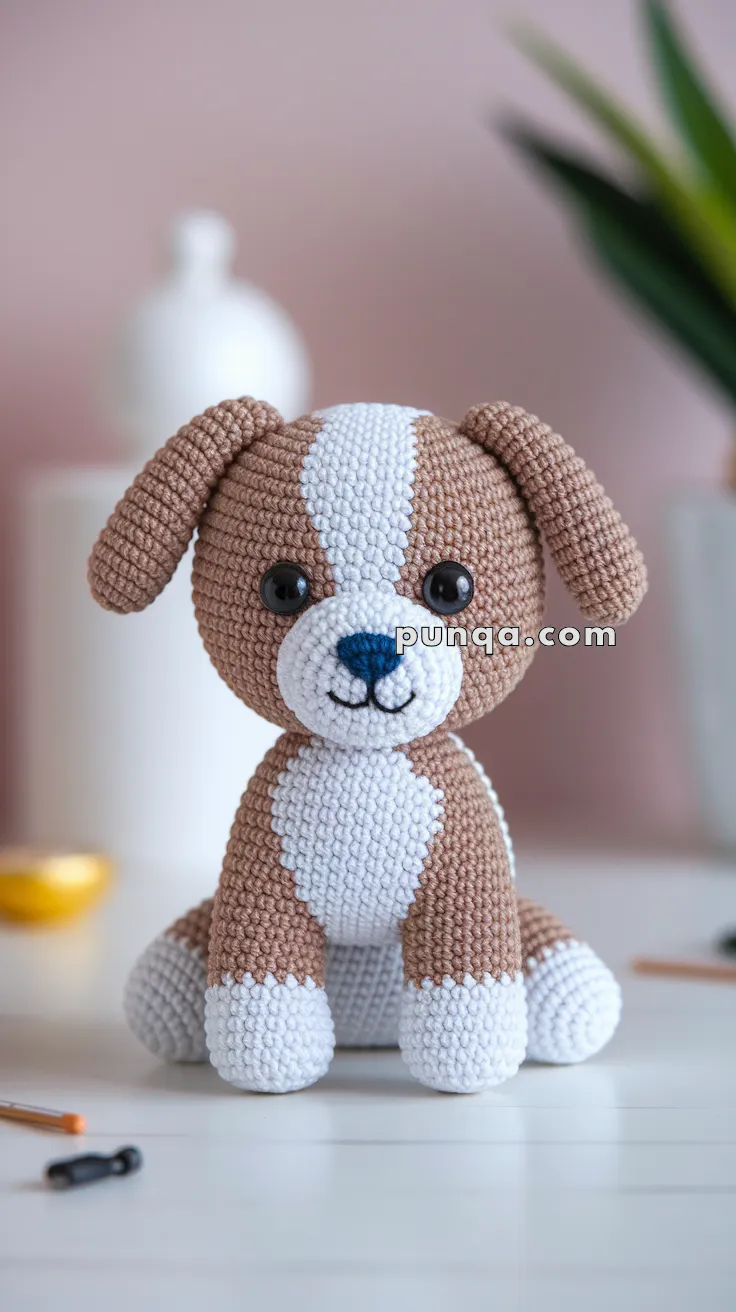
Meet your new favorite crochet companion — a soft and floppy teacup puppy with a big round head, long ears, and an adorable white stripe running from its forehead to its belly. This version perfectly matches the photographed proportions, with a large head, small rounded body, and expressive details that make it come to life. 🧶💕
✨ Skill Level
Intermediate – includes shaping, color changes, and small-part assembly.
📏 Finished Size
Approx. 6–7 inches (15–18 cm) tall when made with DK yarn and a 2.5–3 mm hook.
🧶 Materials and Yarn Amounts
Use DK or light worsted yarn.
Color A – Light Brown (main body, ears, legs, tail): about 45–50 g
Color B – White (markings, muzzle, belly stripe, paws): about 20–25 g
Color C – Dark Blue or Black (nose): a small scrap (less than 1 g)
8 mm safety eyes
Black embroidery thread for mouth
Fiberfill stuffing
2.5–3 mm crochet hook
Tapestry needle
Stitch marker
Scissors
🧵 Abbreviations (US Terms)
MR – Magic Ring
sc – Single Crochet
inc – Increase (2 sc in same stitch)
dec – Decrease (sc2tog)
ch – Chain
sl st – Slip Stitch
FO – Fasten Off
st(s) – Stitch(es)
🐾 Head (Large Round Shape with Stripe)
Round 1: MR, 6 sc
Round 2: inc x6 (12)
Round 3: (1 sc, inc) x6 (18)
Round 4: (2 sc, inc) x6 (24)
Round 5: (3 sc, inc) x6 (30)
Round 6: (4 sc, inc) x6 (36)
Round 7: (5 sc, inc) x6 (42)
Round 8: (6 sc, inc) x6 (48) ← for large head ratio
Rounds 9–13: sc around (48)
Switch to Color A (Brown) but keep 8 center stitches in White to continue the stripe down the face.
Rounds 14–18: sc around (48), maintaining stripe alignment.
Round 19: (6 sc, dec) x6 (42)
Round 20: (5 sc, dec) x6 (36)
Round 21: (4 sc, dec) x6 (30)
Round 22: (3 sc, dec) x6 (24)
Round 23: (2 sc, dec) x6 (18)
Round 24: (1 sc, dec) x6 (12)
Round 25: dec x6 (6)
Stuff firmly, FO and close.
Eyes: Place safety eyes between Rounds 9–10, about 7–8 stitches apart on each side of the white stripe.
🐽 Snout (White)
Round 1: MR, 6 sc
Round 2: inc x6 (12)
Round 3: (1 sc, inc) x6 (18)
Rounds 4–6: sc around (18)
Stuff lightly, FO with long tail.
Sew centered on lower front of head, overlapping the stripe slightly.
Embroider a small oval nose in Color C and a “W”-shaped smile using black embroidery thread.
👂 Ears (Make 2 – Brown)
Round 1: MR, 6 sc
Round 2: (1 sc, inc) x6 (18)
Rounds 3–7: sc around (18) ← stop at Round 7 for correct ear proportion
Flatten, FO and leave a long tail.
Sew to each side of head slightly forward so they hang softly over the cheeks.
🧸 Body (Compact Size with White Stripe)
Round 1: MR, 6 sc
Round 2: inc x6 (12)
Round 3: (1 sc, inc) x6 (18)
Round 4: (2 sc, inc) x6 (24)
Round 5: (3 sc, inc) x6 (30)
Rounds 6–9: sc around (30)
Switch to Color A (Brown) but maintain 6–8 white center stitches down the front for a continuous stripe.
Round 10: (4 sc, dec) x6 (24)
Round 11: (3 sc, dec) x6 (18)
Round 12: (2 sc, dec) x6 (12)
Round 13: dec x6 (6)
Stuff firmly and FO.
Align the white stripe with the head’s stripe for a continuous marking when sewing together.
🦵 Legs (Make 4 – Start in White)
Round 1: MR, 6 sc
Round 2: inc x6 (12)
Round 3: (1 sc, inc) x6 (18)
Switch to Color A (Brown)
Round 4: sc around (18)
Round 5: (1 sc, dec) x6 (12) ← creates taper
Rounds 6–7: sc around (12)
Stuff lightly and FO.
Sew front legs slightly forward and back legs angled outward for the sitting pose.
🐾 Tail (Brown)
Round 1: MR, 5 sc
Rounds 2–4: sc around (5)
Stuff lightly, FO and sew to center back.
💠 Assembly
-
Sew the snout to the head.
-
Attach eyes and embroider the nose and mouth.
-
Sew ears to each side, angled forward.
-
Attach the head to the body, aligning the white stripe continuously.
-
Sew front legs just under the neck area and back legs to the sides of the base.
-
Attach the tail at the back center.
💕 Finishing Touches
-
Add blush or pink yarn on the cheeks.
-
Lightly brush the ears for softness.
-
Embroider small white dots on the eyes for shine.
-
Optional: Add a ribbon, collar, or name tag for personality.
🧶 Design Notes
-
The 48-stitch head gives the correct oversized look compared to the smaller 30-stitch body.
-
Ears end at Round 7 to stay proportional to the big head.
-
Legs taper to create a cuter, slimmer base while keeping balance for sitting.
-
The 8-stitch head stripe and 6–8 stitch belly stripe create the same width and alignment as in the reference photo.
Your Amigurumi Teacup Puppy is ready to melt hearts! 🐾💗
With its large round head, floppy ears, and gentle expression, this little pup is perfect as a handmade gift, decor piece, or collector’s plush. Whether you make one or a whole litter, each will have its own personality — full of warmth, softness, and charm.