Step into a world of rolling green hills and cozy countryside charm with this Amigurumi Shire Landscape crochet pattern! Whether you’re crafting for fantasy lovers, scenic decor, or simply enjoy intricate crochet designs, this free pattern lets you stitch up a picturesque Shire-inspired scene. With its lush grassy textures, tiny cottages, and winding paths, this amigurumi creation captures the peaceful beauty of a storybook landscape. Perfect for displaying as a whimsical accent, gifting to a fellow crochet enthusiast, or simply celebrating the joy of handmade artistry, this crochet project brings the magic of the Shire to life—one stitch at a time! 🌿✨
Designed for customization, this pattern allows you to experiment with different shades of green, embroidered details, or even tiny accessories like miniature trees, stone bridges, or a cozy hobbit hole for extra charm. Craft a classic countryside look, create a vibrant autumn-inspired version, or even stitch up an entire fantasy village with charming details! Whether displayed as a nostalgic keepsake, gifted to a fellow fan of enchanting landscapes, or made simply for the joy of crafting, this Amigurumi Shire Landscape is a delightful and imaginative project—perfect for bringing a touch of cozy magic to every stitch! 🧶🏡
🏡 Amigurumi Shire Landscape Crochet Pattern
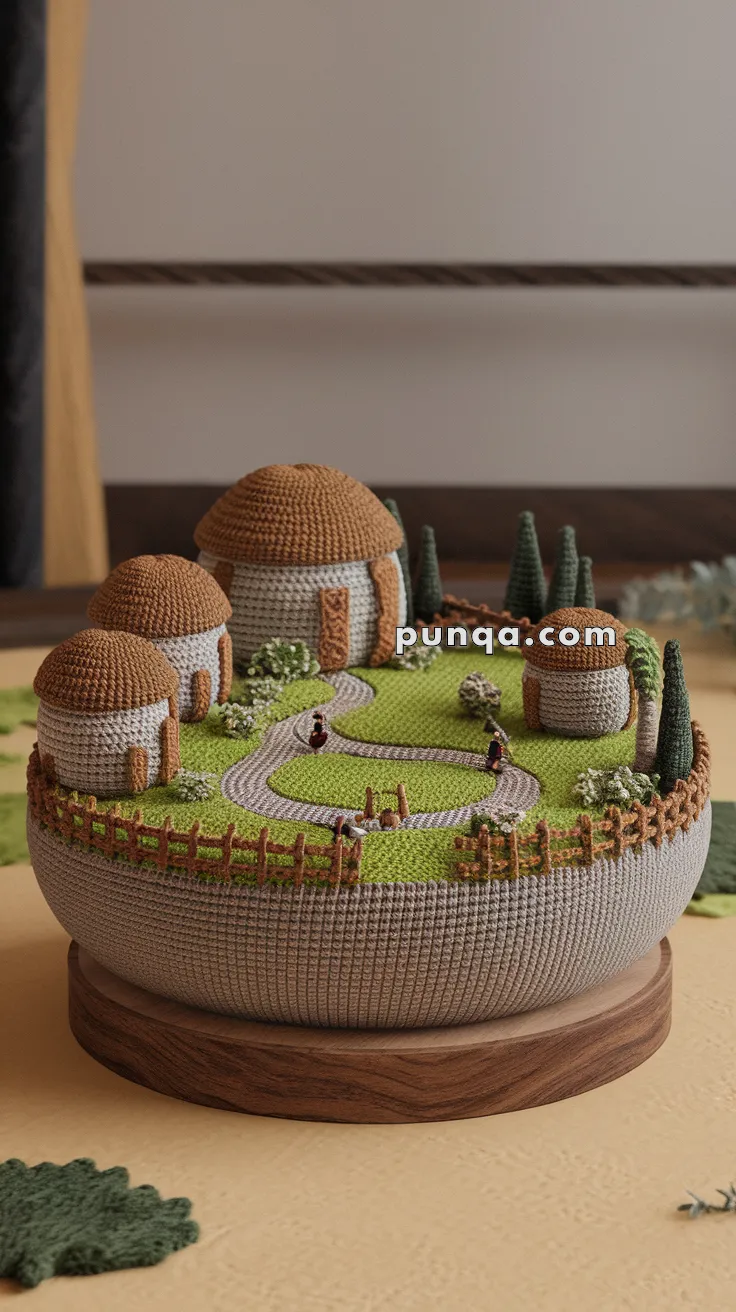
A peaceful miniature Shire landscape that brings cozy, storybook charm to any room. This pattern recreates the exact look of the scene in the photo: rounded hobbit homes, tall pine trees, winding gray paths, textured green grass, and a warm wooden base. Each element is worked separately and assembled into a gentle, earthy diorama perfect for display.
✨ Skill Level
Advanced – requires modular construction, shaping, textured stitching, and detailed assembly.
📏 Finished Size
-
Diameter: 9–10 in (23–25 cm)
-
Height: 5–6 in (13–15 cm)
🧶 Materials
-
Sport or DK weight yarn
-
Warm greige – bowl base
-
Grass green – grass layer
-
Light gray – path
-
Warm brown – roofs
-
Light oatmeal/cream – walls
-
Dark brown – doors + wall accents + fence
-
Forest green – trees
-
-
Crochet hook: 2.5 mm
-
Polyfill stuffing
-
Cardboard circle for stability
-
Wooden disc base (optional)
-
Tapestry needle
-
Stitch marker
🧵 Abbreviations (US Terms)
MR – Magic Ring
sc – Single Crochet
inc – Increase
dec – Decrease
sl st – Slip Stitch
ch – Chain
BLO – Back Loop Only
FLO – Front Loop Only
FO – Fasten Off
🧺 Bowl Base (Greige Yarn)
This forms the deep rounded bowl that holds the entire scene.
MR, 6 sc
inc ×6 → 12
(1 sc, inc) ×6 → 18
(2 sc, inc) ×6 → 24
(3 sc, inc) ×6 → 30
Continue increasing evenly until the circle reaches 8–9 in (20–23 cm) diameter (approx. 90–100 sts).
Side Walls:
sc around for 20–25 rounds, creating vertical sides.
Insert cardboard circle at the bottom, stuff firmly.
FO and weave in ends.
🌿 Textured Grass Disc (Green Yarn)
This piece sits perfectly on top of the bowl.
Repeat the same increases used for the bowl bottom, but do not add side walls.
To match the micro-texture in the photo use:
Pebble Grass Stitch:
Every round: sc in first st, 3rd-loop-sc in next st, repeat around.
Stop when piece sits flush on top of the bowl (approx. 8–9 in).
Do not create a ridge or raised edge.
FO and sew securely onto the top rim of the bowl.
🛤 Winding Path (Light Gray Yarn)
ch 40
sl st back across all chains (creates a flat I-cord-like ribbon)
Make 3–4 pieces of different lengths.
Pin into the exact winding shape:
-
Large outer loop
-
Inner small loop
-
Slight S-curve through center
Sew down with invisible stitches.
🏠 Hobbit Houses (Make 5 Total)
Arrangement:
-
1 large house (back-left)
-
2 medium houses (front-left cluster)
-
1 medium house (front-right)
-
1 small house (right near trees)
🧱 Walls (Cream/Oatmeal Yarn)
MR, 6 sc
inc ×6 → 12
(1 sc, inc) ×6 → 18
(2 sc, inc) ×6 → 24
(3 sc, inc) ×6 → 30
Rounds 6–10: sc around (30)
Stuff lightly.
FO.
🧢 Roof Domes (Warm Brown Yarn)
MR, 6 sc
inc ×6 → 12
(1 sc, inc) ×6 → 18
(2 sc, inc) ×6 → 24
sc around for 2 rounds
(3 sc, dec) ×6 → 18
dec ×6 → 12
FO and sew dome neatly on top of wall cylinder.
🚪 Doors & Accents (Dark Brown Yarn)
Doors (Make 5):
ch 6
Row 1–4: sc across
Row 5: sc2tog, sc, sc2tog (shapes arch)
FO.
Vertical Wall Columns:
For the large house: Make 3 columns
For medium houses: Make 1 column each
For small house: No columns visible
Each column:
ch 8, sc back across, FO.
Positioning:
Attach doors centered.
Attach columns vertically beside doors, matching photo placement.
🌲 Pine Trees (5 Trees in 3 Sizes)
Trunks (Brown Yarn)
MR, 5 sc
Rounds 2–4: sc around
FO.
Cones (Forest Green Yarn)
Small Tree:
MR, 4 sc
(1 sc, inc) ×2 → 6
Rounds 3–7: sc around
Medium Tree:
MR, 4 sc
(1 sc, inc) ×2 → 6
(2 sc, inc) ×2 → 8
Rounds 4–12: sc around
Tall Tree:
MR, 4 sc
(1 sc, inc) ×2 → 6
(2 sc, inc) ×2 → 8
(3 sc, inc) ×2 → 10
Rounds 6–16: sc around
Lightly stuff cones.
Sew trunks under each cone.
Placement:
-
Two tall trees behind large house
-
Three medium and small trees to the right side
-
One small tree near fence corner
🌳 Bushes (Make 5–6)
MR, 6 sc
inc ×6 → 12
sc around one round
FO.
Arrange in clusters near houses and along path bends.
Optional texture: add tiny white French knots as flowers.
🪵 Fence (Dark Brown Yarn)
Uprights (Make ~20–25)
ch 5
sc across
FO.
Rails
ch varying lengths: 7, 8, 9, 10
sc back across
FO.
Attach uprights around the bowl’s upper outer edge.
Angle rails slightly downward to follow the curve of the bowl.
Sew rails horizontally across uprights, matching the rustic look.
🧍 Mini People (Make 3)
Use dark yarn scraps.
Body:
MR, 4 sc
Round 2: sc around
FO.
Head:
MR, 3 sc
FO.
Sew head on top of body.
Place in these positions:
-
One inside the inner loop of the path
-
One at the right section of the path
-
One at the left outer curve
🪄 Final Assembly
-
Attach grass disc to bowl top securely.
-
Sew path pieces in smooth curves.
-
Position and sew houses in their exact clusters.
-
Add trees behind and beside houses.
-
Distribute bushes naturally between houses and path edges.
-
Attach fence around the full perimeter.
-
Secure mini people onto path.
-
Mount bowl onto a round dark walnut wooden base for a finished look.
🌟 Display Idea
Place under a clear dome or on a dedicated shelf for a cozy, story-rich decoration reminiscent of quiet Shire mornings.
This miniature Shire landscape brings warmth, storytelling, and whimsy into any room. A delightful heirloom piece that honors the peaceful charm of hobbit life. 🍃🏡🧵