Gobble up some crochet fun with this Amigurumi Turkey pattern! Whether you’re crafting for festive decor, seasonal gifts, or simply love adorable feathered friends, this free pattern lets you stitch up a charming turkey full of personality. With its plump body, vibrant tail feathers, and cheerful expression, this little turkey is ready to bring warmth and whimsy to your handmade collection. Perfect for autumn celebrations, Thanksgiving centerpieces, or just a fun addition to your crochet lineup, this project is a delightful mix of tradition and creativity.
Designed for customization, this pattern allows you to experiment with rich autumn hues, playful textures, and cute embroidered details to make your turkey uniquely yours. Add a tiny pilgrim hat for a festive touch, craft expressive eyes for extra charm, or even make an entire flock in different colors! Whether displayed on a holiday table, gifted as a seasonal keepsake, or simply crafted for the joy of it, this amigurumi turkey is a rewarding project full of cozy, handmade magic—one stitch at a time! 🦃🧶✨
🦃 Amigurumi Turkey Crochet Pattern
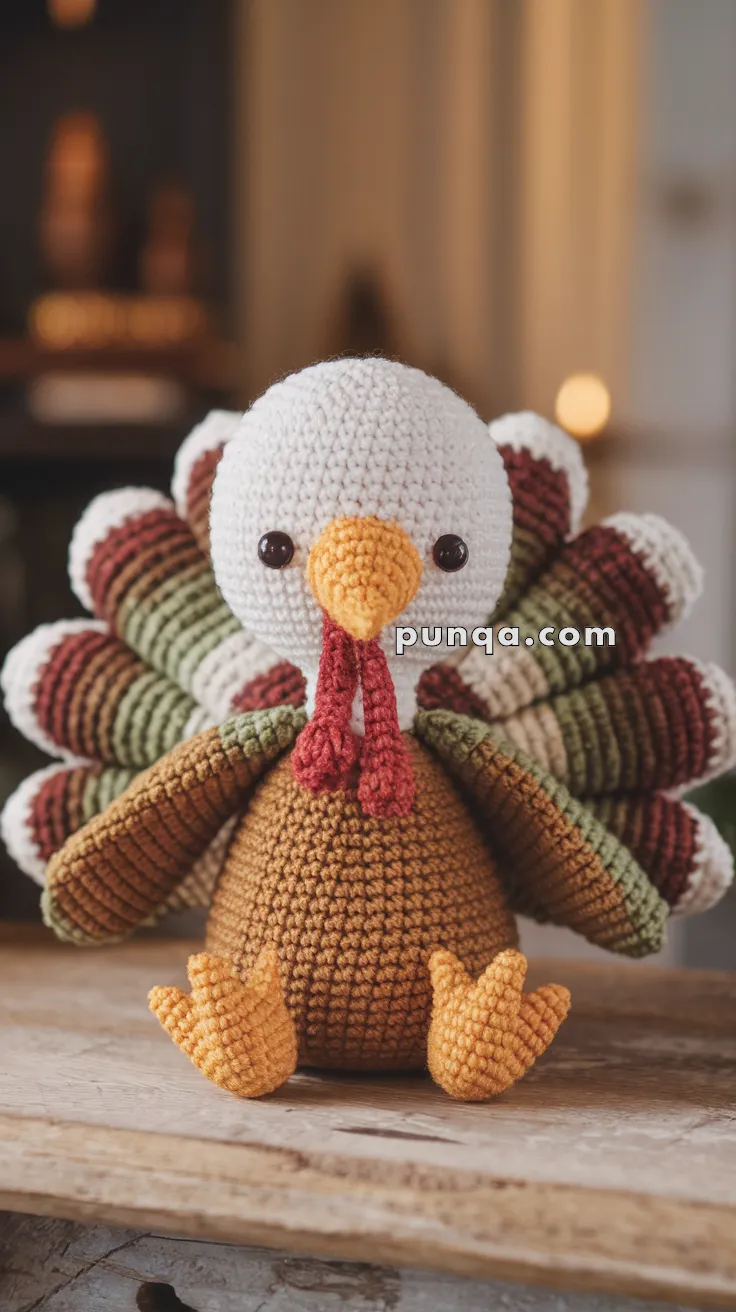
Bring cozy autumn charm into your home with this adorable amigurumi turkey! Featuring a round white head, warm brown body, layered striped tail feathers, long oval wings, a bright beak, and cute little feet, this turkey makes the perfect handmade decoration for Thanksgiving or fall displays.
✨ Skill Level
Intermediate — Includes shaping, color changes, working in rows and rounds, and multi-part assembly.
📏 Finished Size
Approx. 10–12 in (25–30 cm) tall when made with worsted yarn and a 3.0 mm hook.
🧵 Materials
-
Worsted weight yarn
-
White (head)
-
Brown (body & wings)
-
Dark brown, olive green, rust/red-brown (tail feathers)
-
Mustard/orange (feet & beak)
-
Red (wattle)
-
-
3.0 mm crochet hook
-
Safety eyes: 12 mm
-
Polyester fiberfill
-
Yarn needle & scissors
-
Optional: 24–26 gauge craft wire for poseable feathers (display version)
🪡 Abbreviations (US Terms)
-
MR – Magic ring
-
sc – Single crochet
-
inc – Increase (2 sc in same stitch)
-
dec – Decrease (sc2tog)
-
ch – Chain
-
sl st – Slip stitch
-
hdc – Half double crochet
-
dc – Double crochet
-
BLO – Back loop only
🧩 Head (White)
Round 1: MR, 6 sc (6)
Round 2: inc around (12)
Round 3: (sc, inc) ×6 (18)
Round 4: (2 sc, inc) ×6 (24)
Round 5: (3 sc, inc) ×6 (30)
Round 6: (4 sc, inc) ×6 (36)
Rounds 7–15: sc around (36)
Insert 12 mm safety eyes between R10–11, 6 sts apart.
Round 16: (4 sc, dec) ×6 (30)
Round 17: (3 sc, dec) ×6 (24)
Round 18: (2 sc, dec) ×6 (18)
Round 19: (sc, dec) ×6 (12)
Round 20: dec around (6)
FO and close tightly.
🧩 Body (Brown)
Round 1: MR, 6 sc (6)
Round 2: inc around (12)
Round 3: (sc, inc) ×6 (18)
Round 4: (2 sc, inc) ×6 (24)
Round 5: (3 sc, inc) ×6 (30)
Round 6: (4 sc, inc) ×6 (36)
Round 7: (5 sc, inc) ×6 (42)
Rounds 8–17: sc around (42)
Round 18: (5 sc, dec) ×6 (36)
Round 19: (4 sc, dec) ×6 (30)
Round 20: (3 sc, dec) ×6 (24)
Round 21: (2 sc, dec) ×6 (18)
Round 22: dec around (9)
FO and leave long tail for attaching to head.
🧩 Beak (Mustard Orange)
Round 1: MR, 4 sc (4)
Round 2: sc around (4)
Round 3: (sc, inc) ×2 (6)
Round 4: (2 sc, inc) ×2 (8)
Round 5: sc around (8)
Lightly stuff.
FO and sew to the center of face.
🧩 Wattle (Red, Make 2)
Row 1: ch 7
Row 2: sc in each ch (6)
FO, leaving long tails.
Sew the two waddles side-by-side under the beak so they hang to mid-chest.
🧩 Feet (Mustard Orange, Make 2)
Round 1: MR, 6 sc (6)
Round 2: inc around (12)
Round 3: (sc, inc) ×6 (18)
Rounds 4–5: sc around (18)
Toes (3 per foot):
Make directly on top of the round base.
Toe: ch 6, sc back down (5), sl st into next st of foot.
Repeat 2 more times evenly spaced.
FO and sew feet to bottom front of body.
🧩 Wings (Brown, Make 2 — Worked Flat)
These match the long, oval wings in the photo.
Row 1: ch 16
Row 2: sc in 2nd ch from hook, sc 13, 3 sc in last ch. Continue along opposite side: sc 14 (30)
Row 3: sc 14, inc ×3, sc 13 (33)
Row 4: sc 14, (sc, inc) ×3, sc 14 (36)
Rows 5–12: sc across (36)
FO, lightly stuff (optional), and sew sides closed.
Attach wings to the upper-side of the body so they angle slightly downward.
🧩 Tail Feathers (Make 7 — Striped Oval Feathers)
Each feather is long, oval, and layered with stripes exactly as in the photo.
Color order (bottom to top):
Dark brown → Olive → Rust → Brown → White edge
Feather Panel (Worked Flat)
Row 1: ch 11
Row 2: sc in 2nd ch from hook, sc 8, 3 sc in last ch. Continue on opposite side: sc 9 (21)
Row 3: sc 9, inc ×3, sc 9 (24)
Row 4: sc 10, (sc, inc) ×3, sc 10 (27)
Rows 5–6: switch to olive, sc across (27)
Rows 7–8: switch to rust, sc across (27)
Rows 9–10: switch to brown, sc across (27)
Scalloped White Edge
Attach white yarn to the top corner.
(Sc, hdc, dc, hdc, sc) in each stitch around the curved top only (this creates the pronounced scallop).
Sl st down the straight sides.
FO and shape lightly.
Make 7 feathers.
Optional wire:
Insert a wire along the curve before edging and crochet around it.
🧷 Assembly
-
Sew head firmly onto the top of the body.
-
Attach the beak and both wattle strands.
-
Add safety eyes.
-
Sew wings to sides of the upper body.
-
Sew feet so the turkey sits upright.
-
Arrange feathers in a fan shape:
-
Back row: 4 feathers
-
Front row: 3 feathers
-
Slightly overlap each feather
-
Angle outward for a full tail
-
🌟 Finishing Touches
Shape the wings and tail feathers gently.
Adjust the wattle so both strands hang naturally.
Fluff the body to round out the shape.
🎉 Your Cozy Thanksgiving Turkey Is Ready!
This adorable turkey brings warmth and personality to your fall decorations. Whether displayed on a mantel, added to a Thanksgiving centerpiece, or gifted to someone special, it’s sure to become a seasonal favorite. 🦃🍁🧡


Good Morning!
Thank You! I will have to make this for my daughter and granddaughter’s