Amigurumi Baby Dinosaur in Egg – FREE Crochet Pattern

Amigurumi Baby Dinosaur in Egg – FREE Crochet Pattern
Spread the love

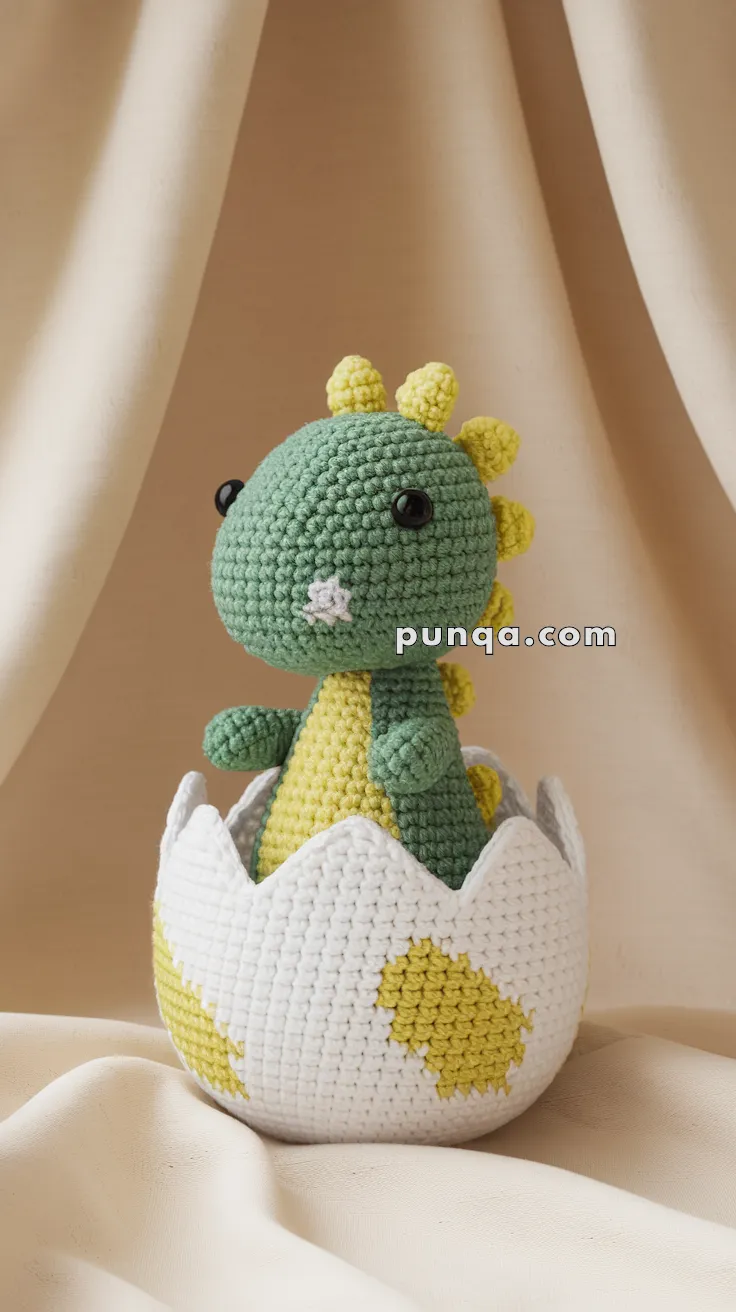
Crack open a world of cuteness with the Amigurumi Baby Dinosaur in Egg, a prehistoric pal that’s ready to hatch straight into your heart! 🦕🧶 This adorable pattern features a tiny dino nestled inside its cozy egg shell, complete with sweet little spikes, stubby limbs, and a curious expression that’s perfect for playtime or display. Whether you’re crafting for a dino-loving kiddo or adding a whimsical touch to your handmade collection, this baby dinosaur is sure to delight.

Perfect for crocheters who love imaginative designs and charming details, this pattern invites you to mix soft colors, playful textures, and fun embellishments. Customize the egg with speckles, add a bow or tiny accessories, or stitch up a whole clutch of baby dinos for extra fun. The Amigurumi Baby Dinosaur in Egg is a joyful way to stitch up smiles, snuggles, and a sprinkle of prehistoric magic—one loop at a time! 🧵🌋

Realistic crochet image for Amigurumi Dinosaur Egg - FREE Crochet Pattern

Copyright & Pattern Usage Policy

🐣 Amigurumi Baby Dinosaur in Egg Crochet Pattern

This adorable baby dino has just hatched! With soft green yarn, bumpy yellow back spikes, and a cozy cracked eggshell, this crochet cutie brings Jurassic joy to any handmade collection.


✨ Skill Level

Intermediate – involves shaping, small sewn details, tapestry colorwork, and a structured egg.


📏 Finished Size

Approximately 17–19 cm (6.5–7.5 in) when placed in the egg.


🧶 Materials

  • Super-bulky chenille yarn (Size 6) or velvet yarn

    • Green – 40 g

    • Soft yellow – 25 g

    • White – 40 g (egg)

    • Gray – very small amount (muzzle)

  • 4.0 mm crochet hook

  • 10 mm black safety eyes

  • Fiberfill stuffing

  • Yarn needle

  • Stitch markers

  • Optional: plastic canvas or craft foam sheet for egg reinforcement

(Works with worsted cotton and a 3 mm hook; final size will be smaller.)


🔤 Abbreviations (US Terms)

MR – magic ring
sc – single crochet
inc – increase
dec – decrease
sl st – slip stitch
ch – chain


Dinosaur Body & Head (One Piece)

Use green yarn.

Body

R1: MR 6
R2: inc × 6 → 12
R3: (sc, inc) × 6 → 18
R4: (2 sc, inc) × 6 → 24
R5–7: sc around (24)
R8: (2 sc, dec) × 6 → 18
R9: (sc, dec) × 6 → 12

Lightly stuff the bottom — it needs to fit comfortably inside the egg.

Transition to Head

R10: inc × 6 → 18
R11: (1 sc, inc) × 9 → 27
R12: (2 sc, inc) × 9 → 36
R13–17: sc around (36)

Insert safety eyes between Rounds 14–15, 6–7 stitches apart.

R18: (4 sc, dec) × 6 → 30
R19: (3 sc, dec) × 6 → 24
R20: (2 sc, dec) × 6 → 18
Stuff head firmly.
R21: (1 sc, dec) × 6 → 12
R22: dec × 6 → 6
FO and close.

Face

Embroider a tiny soft gray X-shaped muzzle under the eyes.
Optional: add light pink blush.


Arms × 2

Use green yarn.

R1: MR 6
R2: (sc, inc) × 3 → 9
R3–6: sc around (9)
Add a tiny amount of stuffing only at the tip.
Flatten the open edge and sew shut.
Attach slightly forward on the body.


Spikes × 6

Use soft yellow yarn.

Each spike:
R1: MR 4
R2: inc × 4 → 8
R3: sc around (8)
FO, leaving tail.

Placement (photo-accurate):

  • 1 spike on the top center of the head

  • 3 spikes down the back of the neck

  • 2 spikes on the upper back

Sew them close together so they appear neatly clustered.


Belly Panel

Use yellow yarn.

Ch 6
Row 1: sc 5
Rows 2–7: sc across (5)
FO.

Sew vertically on the front center of the body.


Eggshell (Double-Wall for Sturdiness)

The egg in the photo is tall, smooth, and stands upright.
This is achieved by creating an inner wall + outer wall, with optional reinforcement between layers.

Use white yarn.

Inner Egg Wall

R1: MR 6
R2: inc × 6 → 12
R3: (sc, inc) × 6 → 18
R4: (2 sc, inc) × 6 → 24
R5: (3 sc, inc) × 6 → 30
R6: (4 sc, inc) × 6 → 36
R7: (5 sc, inc) × 6 → 42
R8–16: sc around (42)
FO.

This inner wall is plain white.


Outer Egg Wall (with Yellow Patches)

Make the same base again (Rounds 1–16), but add patches using tapestry crochet.

Tapestry Yellow Spots (Photo-Accurate)

Work 3 large oval patches using tapestry colorwork:

For each spot (over 3 rounds):

  • Round A: switch to yellow for 2 stitches

  • Round B: yellow for 3 stitches

  • Round C: yellow for 2 stitches

Place patches evenly around the egg.

Continue white for the rest of the stitches.

FO.


Assemble the Walls

  1. Place the outer wall over the inner wall, aligning stitches.

  2. Optional (adds perfect stability): place a strip of plastic canvas or foam sheet between the walls.

  3. Whipstitch the two layers together along the top round.

This creates a thick, rigid, self-standing eggshell exactly like the photo.


Cracked Egg Top Edge

Work the decorative crack on the outer wall only.

Across all 42 sts, repeat:

sc, hdc, dc, dc, dc, hdc, sc, sl st

This forms the tall, wide triangular cracks characteristic of the photo.


Final Assembly

  1. Insert dinosaur into egg until body sits securely.

  2. Tack the bottom of the dinosaur lightly to the inner wall if desired.

  3. Arrange arms to peek naturally over the cracked rim.

  4. Adjust spikes and belly panel.


Finished Look

Your finished dino features:

  • A soft green head and narrow body

  • Round cheeks and tiny gray muzzle

  • Six plump yellow spikes

  • A tall, smooth white eggshell

  • Three big yellow tapestry patches

  • Wide, high triangular cracks

  • A firm double-wall structure that stands up beautifully

Perfect as nursery décor, a baby gift, or an adorable shelf companion.


Spread the love

Comments

No comments yet. Why don’t you start the discussion?

Leave a Reply

Your email address will not be published. Required fields are marked *